
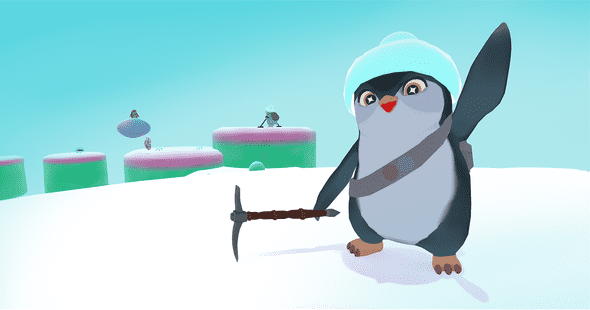
Dyp The Penguin is a complete project which includes a micro penguin adventure. This Unity asset offers a simple yet powerful set of character scripts. It’s primary use case is to quickly create game prototypes. It offers features such as taking and dealing damage, dying/re-spawning, interaction, moving platforms, picking up, dropping and equipping items, etc… The implementation of these features are simple which means they are a bit limited. That being said the code is well structured and fully documented. Therefore it can easily be extended to your own needs with a bit of custom code.
In addition of scripts you get some props, custom shaders created using Amplify Shader and of course the Dyp penguin character.
Contents
The asset contains the following:
- The Dyp character model with textures, shaders (Amplify Shader) and effects
- The Environment, including the clouds, crystals, a pickaxe and a fish
- The scripts include a pool manager, damageable, interactable, UsableItem, etc…
- A demo scene with a mini game where Dyp needs to save his friendly penguin by breaking his chains
The asset requires:
- Unity 2019.4 or higher
- TextMeshPro v2 or higher
- Cine machine v2.5 or higher
- Post processing stack v2.3 or higher
- Built-in Renderer or URP (Shaders for URP include only fresnel and two color, the final look is different from the Built-in version)
The asset does not support:
- HDRP
Getting started
Before importing the asset in your project make sure to download the required packages from the package manager. Go to Window -> Package Manager.
Import the following packages:
- Cine machine v2.5 or higher
- Post processing stack v2.3 or higher
If you do not import those packages prior this asset errors will pop up in the console.
The best way to get started is by trying out the demo scene. By checking the game objects in the scene and the components attached to them you’ll get an idea of how components interact with each other.
When starting a new scene you can drag and drop the “Dyp” character prefab into a scene to get started right away. You may also add the “Character UI” prefab to view your character health and items.
From there you can block out a level with primitive shapes and/or prefabs from the asset. You may add simple components such as “Interactable” or “Damageable” to make your scene more dynamic.
This documentation will teach you how to take advantage of each component and even extend them to fit your exact needs.
The basics
Before getting started with the asset it is important to learn the basics of C# coding in Unity. The following section will explain MonoBehaviours, classes, structs, interfaces and more. If you already now what these are and how to use them feel free to skip to the next sections.
MonoBehaviours, Classes, Structs and Interfaces
To take the full advantage of the asset it is important to learn the basics of C# and the Unity API. There are many great tutorials out there so I will give a brief explanation here and you may look for more details online if you need to.
MonoBehaviours
MonoBehaviours is a class within the Unity API that is used to create components. Components are logic that you can attach to a game object. They have useful methods which are called by Unity itself such as Awake, Start, Update, OnTriggerEnter, OnTriggerExit, etc… You may find all those methods and the order in which they are called here: https://docs.unity3d.com/Manual/ExecutionOrder.html
Usually MonoBehaviours are used whenever you need logic that interacts with the game world such as “Character” or “MovingPlatform”. It is good practice to keep your MonoBehaviours simple and modular so that they can be reused in different circumstances.
Example of a MonoBehavior
/// <summary>
/// Billboard Allows you to make a game object look at the camera.
/// </summary>
public class Billboard : MonoBehaviour
{
    [Tooltip("Use the lookAt function or make the object face the same way as the camera?")]
    [SerializeField] protected bool m_LookAt;

    protected Transform m_CameraTransform;

    /// <summary>
    /// GEt the camera transform.
    /// </summary>
    private void Awake()
    {
        m_CameraTransform = Camera.main.transform;
    }

    /// <summary>
    /// Look at the camera.
    /// </summary>
    void Update()
    {
        if (m_LookAt) {
            transform.LookAt(m_CameraTransform.position, Vector3.up);
        } else {
            transform.forward = m_CameraTransform.forward;
        }
    }
}
Classes
Classes define a type of object. Each object of a class has a reference which makes it unique. An example for a class is “Animal”. An class can have subclasses which we call inheritors. For the case of “Animal” we could have a sub-class “Penguin”, “Pig”, etc… objects can be created from a class for example you could make a Penguin object call it “Dyp” and another Penguin object and called it “Sloom”.
As mentioned before MonoBehaviours is a class and by default when creating a script in Unity it will have a template that automatically makes the script inherit MonoBehaviours. You do not have to derive from MonoBehaviours, if you wish you can derive from other classes, or from nothing.
Example of a class:
/// <summary>
/// script used to rotate a character.
/// </summary>
public class CharacterRotator
{
    protected readonly Character m_Character;

    /// <summary>
    /// Constructor.
    /// </summary>
    /// <param name="character">The character.</param>
    public CharacterRotator(Character character)
    {
        m_Character = character;
    }

    /// <summary>
    /// Rotate the character in respect to the camera.
    /// </summary>
    public virtual void Tick()
    {
        var charVelocity = m_Character.IsDead
            ? Vector2.zero
            : new Vector2( m_Character.CharacterInput.Horizontal, m_Character.CharacterInput.Vertical);

        if (Mathf.Abs(charVelocity.x) < 0.1f &&
            Mathf.Abs(charVelocity.y) < 0.1f) {
            return;
        }
        float targetRotation =
            Mathf.Atan2(charVelocity.x, charVelocity.y)
            * Mathf.Rad2Deg + m_Character.CharacterCamera.transform.eulerAngles.y;

        Quaternion lookAt = Quaternion.Slerp(m_Character.transform.rotation,
            Quaternion.Euler(0,targetRotation,0),
            0.5f);

        m_Character.transform.rotation = lookAt;
    }
}
Structs
Structs are used to group values and objects together. The way the are written is similar to a class. They function very differently though. A struct cannot inherit from another struct. Structs do not create objects they create values, therefore they are saved on the stack and not the heap, which can reduce garbage collection. The tradeoff is that modifying the struct value will only work on the local scope of the code, therefore struct should in principle be immutable. If you do not know about stack, heaps, garbage collection, etc… you may research about it but it is not required to understand them to create game prototypes or simple games in general.
Example of a struct:
/// <summary>
/// An item amount.
/// </summary>
[Serializable]
public struct ItemAmount
{
    [Tooltip("The item definition.")]
    [SerializeField] private ItemDefinition m_ItemDefinition;
    [Tooltip("The item.")]
    [SerializeField] private Item m_ItemComponent;
    [Tooltip("The amount.")]
    [SerializeField] private int m_Amount;

    private IItem m_Item;

    public int Amount => m_Amount;
    public IItem Item
    {
        get
        {
            if (m_Item != null) { return m_Item;}

            if (m_ItemComponent != null) {
                m_Item = m_ItemComponent;
                return m_Item;
            }

            if (m_ItemDefinition == null) { return null;}

            return m_ItemDefinition.DefaultItem;
        }
    }

    /// <summary>
    /// Constructor.
    /// </summary>
    /// <param name="item">The item.</param>
    /// <param name="amount">The amount.</param>
    public ItemAmount(IItem item, int amount)
    {
        m_Amount = amount;
        m_Item = item;
        m_ItemComponent = item as Item;
        m_ItemDefinition = item?.ItemDefinition;
    }

    public static implicit operator ItemAmount( (int,IItem) x)
        => new ItemAmount(x.Item2,x.Item1);
    public static implicit operator ItemAmount( (IItem,int) x)
        => new ItemAmount(x.Item1,x.Item2);
}
Interfaces
Interfaces define a contract that any class or struct that inherits it needs to abide to. In an interface you may define the public setters/getters, methods and events that the inheritors need to implement.
By using an interface you no longer care whether an object has class A, B or C, you only care that you can call a specific method on that object. Interface are useful for very generic functionality such as interaction or damaging.
Example of interfaces:
/// <summary>
/// The interactable interface used to be interact with by an interactor..
/// </summary>
public interface IInteractable
{
    bool IsInteractable { get; }
    bool Interact(IInteractor interactor);
    bool Select(IInteractor interactor);
    bool Unselect(IInteractor interactor);
}

/// <summary>
/// The interactor allows you to interact with interactables.
/// </summary>
public interface IInteractor
{
    void AddInteractable(IInteractable interactable);

    void RemoveInteractable(IInteractable interactable);
}

/// <summary>
/// The character interactor has a reference to a character.
/// </summary>
public interface ICharacterInteractor : IInteractor
{
    Character Character { get; }
}
Character
The character script is a MonoBehaviour which is used to group the scripts that will control the character. The control scripts are each used to control a very specific piece of the character. For example we have the character mover which is used to move the character and the Character Rotator which only deals with rotating the character. Keeping these controls modular and well separated allows you to swap them out by something else without having to change code all over the place.
For people who do not want to write a line of code, you are free to use the components available within the demo. But for those who are ready to give it a shot, try adding a new character controls and you’ll find that it is easier than you’d think thanks to the way the character script is organized.
For example you could override the function below of the Character script and replace the characterInput by your own script.
/// <summary>
/// Assign the controllers for your character.
/// </summary>
protected virtual void AssignCharacterControllers()
{
    m_CharacterMover = new CharacterMover(this);
    m_CharacterRotator = new CharacterRotator(this);
    m_CharacterAnimator = new CharacterAnimator(this);
    m_CharacterInput = new CharacterInput(this);
}
Most beginner Unity programmers believe that you must write a MonoBehaviour and put all your logic in one big Update function so that it can be processed on each frame. This can become quickly very messy. To keep things clean you can instead use the “Tick” pattern, which consists of calling a Tick function on a class within the MonoBehaviours Update function like so:
protected virtual void Update()
{
m_CharacterMover.Tick();
m_CharacterRotator.Tick();
...
}This way the character control script can run logic every frame without being a MonoBehaviour.
Setting up a Character
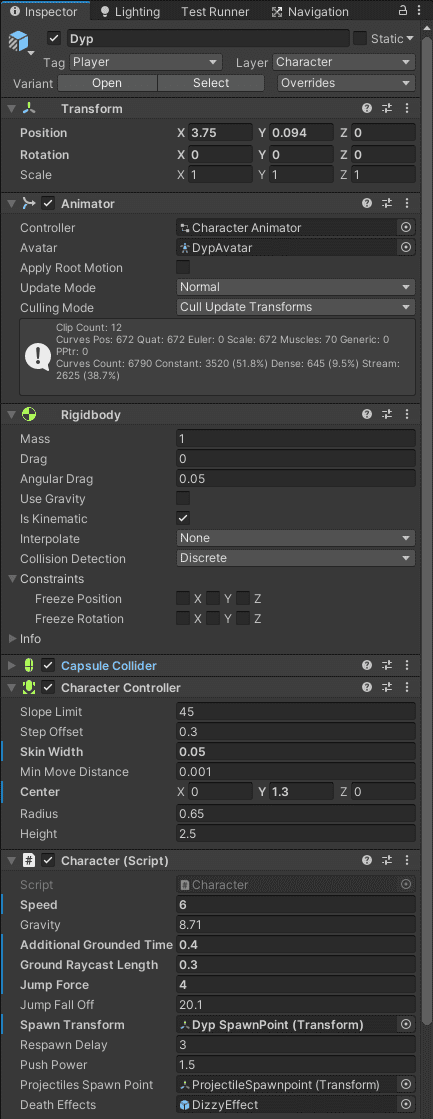
For the character script to work correctly you’ll need to add an animator and make sure the Apply RootMotion is off. You should also add a Rigidbody, it must be set as kinematic. Gravity is set on the character mover. The Character controller is also required as it is used by the default Character Mover script. Here is an example of the character in the inspector:
Character Mover
The default character mover is used to move the character respective to the camera. It takes in a speed value to change the movement speed of the character.
These are the relevant interfaces for character mover and any other object that moves.
/// <summary>
/// Interface for the character mover.
/// </summary>
public interface ICharacterMover : IParentMover
{
    Vector3 CharacterInputMovement { get; }
    bool IsJumping { get; }
}

/// <summary>
/// Interface for the parent mover.
/// </summary>
public interface IParentMover : IMover
{
    void AddExternalMover(IMover mover);
    void RemoveExternalMover(IMover mover);
}

/// <summary>
/// Interface for the mover.
/// </summary>
public interface IMover
{
    void Tick();
    Vector3 Movement { get; }
    void SetParentMover(IParentMover parent);
}
We make good use of the IParentMover and IMover interfaces to allow you to add external movements to the character. Examples are moving platforms and knock-back from attacks.
Character Rotator
The default character rotator rotates the character in the direction of the input. This allows the character to always look where it is trying to go.
No interfaces are used. Only a Tick function that can be overridden.
Character Input
The character input allows you to map actions to inputs. You’ll most likely need to add your own if you wish to extend functionality.
All it requires is to inherit the ICharacterInput script.
The character input expects Horizontal, Vertical inputs as well as Jump, interact and using/equipping/dropping items
public interface ICharacterInput : IItemInput
{
float Horizontal { get; }
float Vertical { get; }
bool Jump { get; }
bool Interact { get; }
}
public interface IItemInput
{
bool UseEquippedItemInput(IUsableItem item, int actionIndex);
bool UseItemHotbarInput(int slotIndex);
bool DropItemHotbarInput(int slotIndex);
}Character Animator
The character animator will animate the character depending on the state of the other character controls. Example: animate the character moving when the character mover is moving the character.
The Animator is separated in three layers:
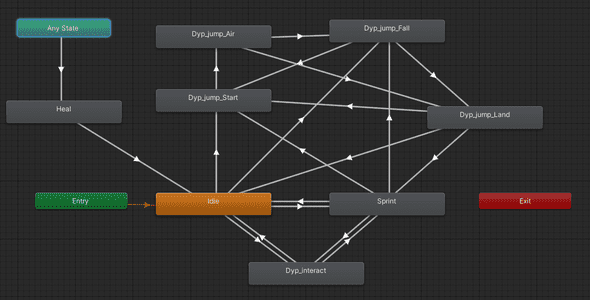
Locomotion:
Locomotion is used for movement, jumping and interaction
Actions:
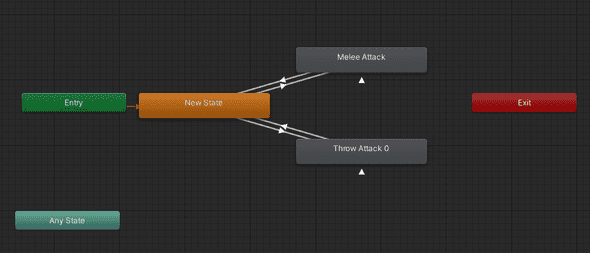
Actions is used for attacks. We use three item parameters.
- Item : The item index. In the demo pickaxe -> 1, snowBall -> 2
- ItemActionIndex : The index of the action to perform for the item specified. pickAxe Swing -> 1, snowball throw -> 1
- ItemAction : Trigger the action once the other two parameters are set.
The item an itemActionIndex values for the pickaxe and snowball are defined in the CharacterAnimator script.
Reaction:
Reaction is used when getting hit or being killed. It overrides all other animations from layers bellow.
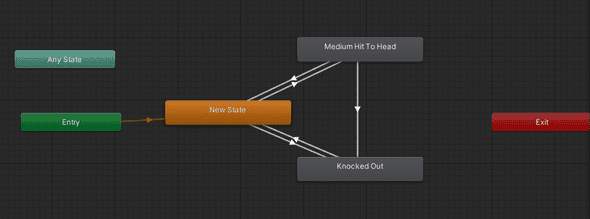
More about the character
The character script works with other components like the Damageable, interactor and inventory.
Interactors and Interactables
Interactors and Interactables interfaces are used for components to interact with each other. Interactors can select, unselect and interact with interactables. When the interactable is selected, unselected or interacted with it sends an event, which you can use to do any number of interesting things. You could interact with an object to pick up an item or action a lever that opens a path, etc…
/// <summary>
/// The interactable interface used to be interact with by an interactor..
/// </summary>
public interface IInteractable
{
    bool IsInteractable { get; }
    bool Interact(IInteractor interactor);
    bool Select(IInteractor interactor);
    bool Unselect(IInteractor interactor);
}

/// <summary>
/// The interactor allows you to interact with interactables.
/// </summary>
public interface IInteractor
{
    void AddInteractable(IInteractable interactable);

    void RemoveInteractable(IInteractable interactable);
}

/// <summary>
/// The character interactable has a reference to a character.
/// </summary>
public interface ICharacterInteractor : IInteractor
{
    Character Character { get; }
}
For example we can interact with the crystals in the demo scene to move the moving platforms.
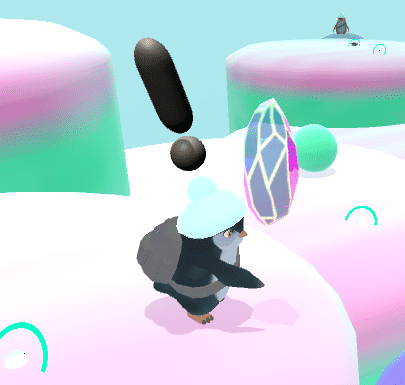
Usually an interactable will be paired with an InteractableBehaviour which defines what happens when the interactable is interacted with. You can write your own InteractableBehaviours to create custom features. You can also use the Unity Actions directly in the inspector to trigger some functions on interaction without writing a line of code.
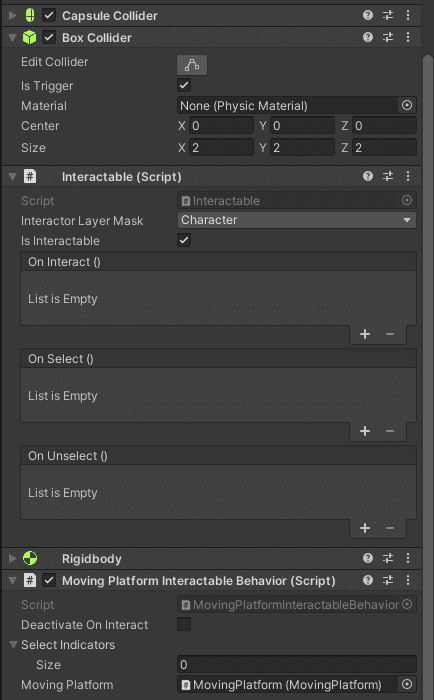
As you can see in the picture above we are using an moving platform interactable behavior. An interactable behavior is a component that listens for events on an interactable component. It can be easily extended.
Damageable
The damageable interface is used by objects or characters to take damage, heal and die. You can listen to those events to add functionality.
/// <summary>
/// The damageable interface.
/// </summary>
public interface IDamageable
{
    event Action OnHpChanged;
    event Action<Damage> OnTakeDamage;
    event Action<int> OnHeal;
    event Action OnDie;

    GameObject gameObject { get; }

    int MaxHp { get; }
    int CurrentHp { get; }

    void TakeDamage(int amount);
    void TakeDamage(Damage damage);

    void Heal(int amount);
    void Die();
}

/// <summary>
/// The damager interface.
/// </summary>
public interface IDamager
{
    GameObject gameObject { get; }
    int DamageTypeIndex { get; }
}
For example whenever a character’s health changes when taking damage or healing I update the health slider with the HealthMonitor.
When you want to damage a damageable it is as simple as to write:
damageable.TakeDamage(10);
//or
damageable.TakeDamage(damage);
You can instantly kill a damageable with:
damageable.Die();When dying a character will re-spawn at a spawn point specified in the inspector.
The damage struct has information about the amount of damage, the direction, the damager and the damageable
/// <summary>
/// The damage object contains information about the damager, damageable, etc...
/// </summary>
[Serializable]
public struct Damage
{
    [Tooltip("The damage amount.")]
    [SerializeField] private int m_Amount;
    [Tooltip("The force in the the damager hit the damageable.")]
    [SerializeField] private Vector3 m_Force;
    [Tooltip("The damageable being hit.")]
    [SerializeField] private IDamageable m_Damageable;
    [Tooltip("The damager hitting the damageable.")]
    [SerializeField] private IDamager m_Damager;

    ...
}
As shown at the beginning of this section the damager has a damage type index which allows us to decide if a damage should be processed or not. For example in the demo we prevent the snowballs from being able to break the chains of the nice penguin by setting an index of 1 to the pickaxe damage type and a 0 for the snowball.
Inventory
The inventory is used to keep track of a list of items. You can add items as follows:
public int Add(item, amount)
public int Add(itemAmount)
public int Remove(item, amount)
public int Remove(itemAmount)
We use the Character inventory to keep track of the items picked up by the character. It is also used to equip items and use them.
public void Equip(item)
public void Unequip(item)
public void TickUse(usableItem)
Item Definition
The item definition is a scriptable object that contains data about an item, such as its name, icon, etc… Using scriptable objects makes it very easy to create items and organize them. When an item is spawned you can use the itemDefinition to tell if the items are similar. If the item is flagged as not unique the items can be stacked.
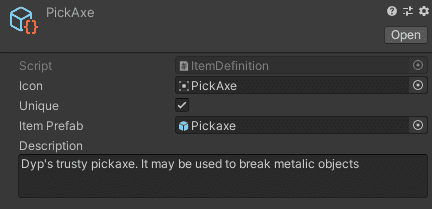
you can create item definition by right-clicking in the project view and going to Create -> Dypsloom -> Inventory -> ItemDefinition.
Item
The item is a game object that is bound to an ItemDefinition. Items are prefabs that can easily be instantiated in the scene with different components.
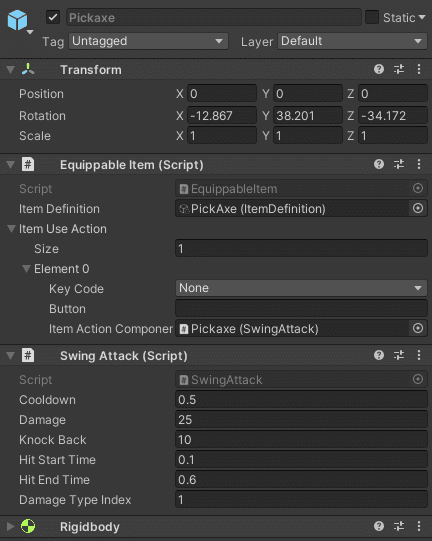
The demo has a Consumable Item and Equippable Item types. There are two main function Use and drop. Use is meant to be overridden by you to do exactly what you want when the item is used.
public interface IItem
{
    ItemDefinition ItemDefinition { get; }
    void Use(Inventory itemInventory);
    void Drop(Inventory itemInventory, int amount);
}
When items are equipped they can be used with item actions.
public interface IItemAction
{
    bool CanUse { get; }
    void Use(IItem item, IItemUser itemUser);
}
Item Actions are used in the demo to swing attack with the pickaxe or to throw a snowball. The SwingAttack and ThrowAttack scripts inherit the ItemActionComponent class.
Item Pickup
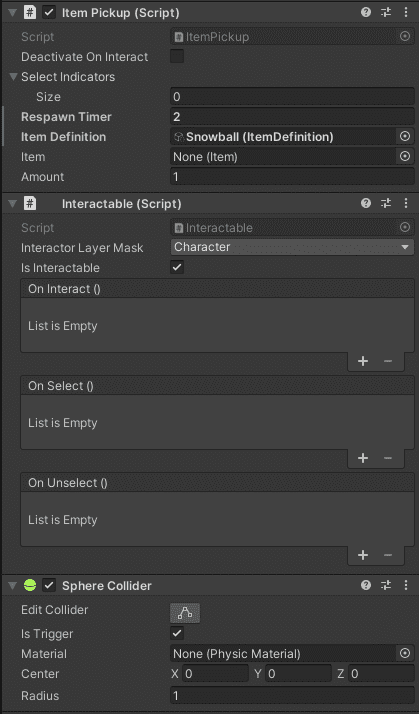
The item pickup lets you define the item and the amount the character will pickup when it interacts with the interactable. By setting the item definition field without setting the item field, and item will be automatically spawned under the pickup at the start of the game. This is done by the InventoryManager.
Item Hot Bar
The hot item bar allows you to see the items that your character has. You can use/equip/drop the items you want once the character picks them up. Use the keys 1-9 to use items in the hot bar or equip them if they are equippable. Use ctrl+key or ctrl+mouse click to drop the item.
Camera
We chose to use cine machine for our camera control as it offers a lot of powerful features. When making a simple character like ours there is no need for a custom camera script, cine machine has all we need. It takes care of camera transitions and you can easily change the camera type from a free view to a static view.
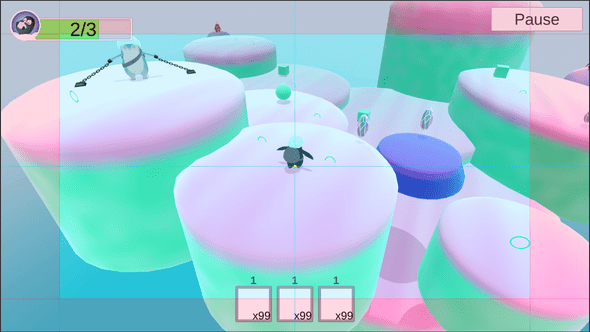
You can learn more about CineMachine here
User Interface
The UI is simple and mostly consists of monitors that lets you view information about your player. For example we have a health monitor which listens to events on the character damageable component to update the slider.
Of course the item hotbar is also part of the UI.
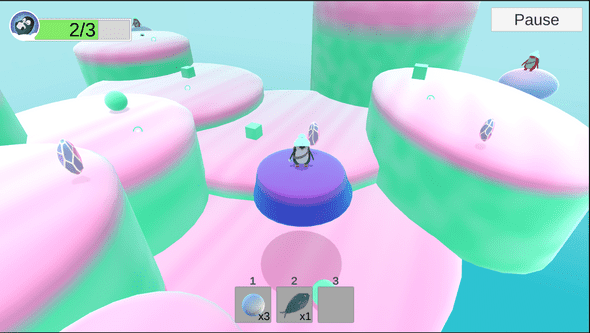
We also provide as simple pause menu which stop time and opens a menu with options to Resume or Quit the game. This is taken care of by the Game Manager component.
Universal Render Pipeline (URP)
Make sure to install the URP package in your Unity project. Once installed the demo scene for Dyp the Penguin will be pink. Go to Dypsloom -> Dyp the Penguin -> dyp_the_penguin_urp. Open that package and all the materials, shaders and prefabs will update to use URP.
The final result will look different as the shaders are quite different.
