
Rhythm Timeline 2 is a Rhythm Game framework built around the Unity Timeline editor. V2 is a continuation of Rhythm Timeline, and builds on all it’s good points while also improving and adding new features.
Rhythm Timeline 2 is built on the Unity Timeline package and makes creating rhythm tracks in the Unity Editor super easy. Want cinematic visuals synced perfectly to your rhythm tracks? No problem! In addition all Unity Timeline features work too, so you may create cinematic views animated by the timeline while your rhythm tracks are playing. It will be synced automatically and everything can be previewed in the Editor, no need to enter play mode to see the result. This is what sets Rhythm Timeline apart from the rest.
The Notes can easily be edited without any code, both in game and in the editor. Those who wish to take the system further can write some code to create custom notes with special functionality. Rhythm Timeline source code was refactored many times to be as simple as possible. All the source code is included!
After 5 years on the Asset store, we finally released Version 2.0 with tons of new features and improvements, including some new demo scenes with completely customized gameplay showcasing how flexible the system really is.
- Penguin Track demo : Your classic Guitar Hero like rhythm game
- OSU style demo: With custom note components and input manager
- VR Beat saber style demo: For Meta Quest 3 headsets, With custom note components and input manager
Version 2.0 also includes the following new features:
- Midi file importer that can convert a Midi file into a Rhythm Timeline
- Improved Score Settings and Score Manager
- Better support for the new Input System
- Note Generators for auto generating notes on the tracks
- Interfaces for custom notes editor handles when selecting notes in timeline
This is in addition to the already extensive features built in Version 1:
- Rhythm track Editor using Timeline
- Preview note positions from the Game View in Editor mode
- Drag & Drop Note Definitions on the Rhythm Tracks
- Bpm & Non-Bpm constrained Note duration and position supported
- Fully customizable Note Prefabs
- Customizable Editor Clips
- Event Senders and Receivers for each Input & Note state
- Easy to use Pool, Toolbox, and Scheduler utility scripts
- Accuracy & Score system
- Full source code Included with comments and documentation
Rhythm Timeline really is the only Unity rhythm game framework you’ll ever need. We are consistently helping devs in our Discord, so make sure to join. You can find our links on our website: https://dypsloom.com/
Contents
Main Features
- Rhythm track Editor using Timeline
- Preview note positions from the Game View in Editor mode
- Drag & Drop Note Definitions on the Rhythm Tracks
- Bpm & Non-Bpm constrained Note duration and position supported
- Fully customizable Note Prefabs
- Customizable Editor Clips
- Event Senders and Receivers for each Input & Note state
- Easy to use Pool, Toolbox, and Scheduler utility scripts
- Accuracy & Score system
- Midi file importer that can convert a Midi file into a Rhythm Timeline
- Support for both Old and new Input Systems
- Note Generators for auto generating notes on the tracks
- Full source code Included with comments and documentation
The asset contains the following:
- 3 Major demo scenes: Tracks, OSU and Beat Saber Style (All demos are setup for URP, switching to other Render Pipelines should be trivial)
- Custom Playable scripts for the Rhythm Track, Timeline Asset, Clip and more
- 11 timelines with 8 music of different genres.
- 10 Note scripts, 14 Note prefabs: Tap, Hold, Counter, Swipe (Left, Right, Up, Down), OSU, OSU Spline, VR Trigger, VR Slice, etc…
- Utility scripts: Scheduler, Object Pool, Toolbox
- Accuracy and scoring system with saving to disk
- Demo scene with a song chooser, works both on PC and Mobile devices
The asset requires:
- Unity 2022.3 or higher (default dependency packages versions are for Unity 6 or higher, downgrade if necessary)
- Timeline v1.8 or higher
OSU demo scene requirements:
- 2D Sprite Shape V9.0.5 or higher (Defaults to 10.0.7 downgrade to 9.0.5 for Unity 2022.3)
- Splines V2.6 or higher
VR demo scene requirments:
- Meta OpenXR V2 or higher
- Interaction Toolkit V3 or higher
Getting started
Before importing the asset in your project make sure to download the required packages from the package manager. Go to Window -> Package Manager.
Import the following packages:
- Timeline v1.8 or higher
OSU demo scene requirements:
- 2D Sprite Shape V10 or higher
VR demo scene requirments:
- Meta OpenXR V2 or higher
- Interaction Toolkit V3 or higher
If you do not import those packages prior this asset errors will pop up in the console.
I also recommend you check out the video tutorials
The best way to get started is by trying out the main demo scene “Penguin Tracks Demo” or “Basic Demo”. By checking the game objects in the scene and the components attached to them you’ll get an idea of how components interact with each other.
The main game objects to look at are:
- Game Managers
- Pool Manager : Automatically pools objects to improve performance
- Toolbox : Register and get any object from anywhere using the Toolbox
- Dsp Time : Get the Dsp Time or the adaptive Dsp Time from anywhere
- Rhythm Game Manager : The manager used in the demo to control the UI and the gameplay loop
- Score Manager : The manager that listens to the notes being triggered through events and manages the score
- Save Manager : Saves the scores to a file
- Rhythm Director
- Rhythm Director : This takes care of setting all the parameters correctly when a timeline asset start playing, it also maps Track Objects to Timeline Rhythm Tracks.
- Playable Director : The default Timeline component used by the Rhythm Director (Make sure to set it as Update Method DPS Clock)
- Rhythm Processor : Takes care of managing Notes and receiving input event
- Rhythm Input Manager : Works with both the Old and new Input system. it notifies the rhythm processor that what input was pressed
- Game World -> Default -> TrackObjects
- Track Object : Define the start and end points for that track
When starting fresh it is recommended to duplicate the demo scene. and build on top.
Creating a new Scene
If you wish to create a scene follow these steps:
1) Create a new empty scene. 2) Drag and drop in the new Scene the “Rhythm Director” prefab and “Managers” prefab from the “Assets/Dypsloom/RhytmTimeline/Demos/Shared/Prefabs” folder. 3) Drag and drop as many “Track Object” prefabs as you want (The demo songs use 4). Adjust their positions such that the target end position can be seen in the game view. 4) Make sure to reference those track objects in the director, under the Track Objects field. 5) (Optionally) Make sure to toggle the Play On Start option on the Rhythm Director. This will allow you to start playing your songs without having to create a game manager for selecting songs. The song timeline can be set in Playable field the Playable Director component next to the Rhythm Director 6) (Optionally) Add UI to display the score by assigning Text Mesh Pro components in the Score Manager (in Managers). 7) You may create a Rhythm Timeline Asset (learn how below) and set it in the Playable Director. Make sure the amount of tracks in the timeline matches the amount of track objects in the scene.
After following those steps you should be able to play your songs in the new scene. It is recommended you start creating your own custom Rhythm Game Manager from scratch to create your own gameplay loop. You are free to use the song chooser provided in the demo scene, but you may wish to create your own.
The rest of this documentation will teach you how to take advantage of each existing component and even extend them to fit your exact needs.
Rhythm Timeline Asset
The Rhythm Timeline asset is a custom Timeline Asset which has information about your song, such as the BPM, the Author, a description, etc…
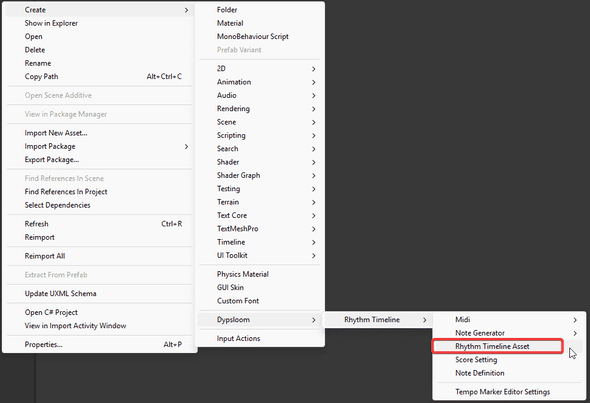
You can create a new Rhythm Timeline Asset using right-click in the project view and pressing Create -> Dypsloom -> RhythmTimeline -> Rhythm Timeline Asset.
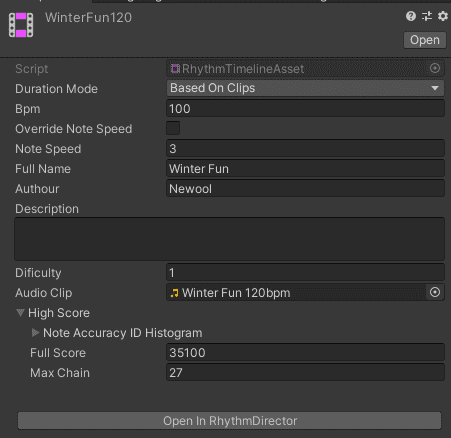
Once created and selected in the inspector you will see an “Open in Rhythm Director” button. Make sure that a Rhythm Director is setup correctly in the scene. Pressing the button will setup the RhythmTimeline as the current Playable such that it can be edited while viewing the preview.
It is recommended to open a Timeline window and the Game window adjacent to one another when editing the tracks.
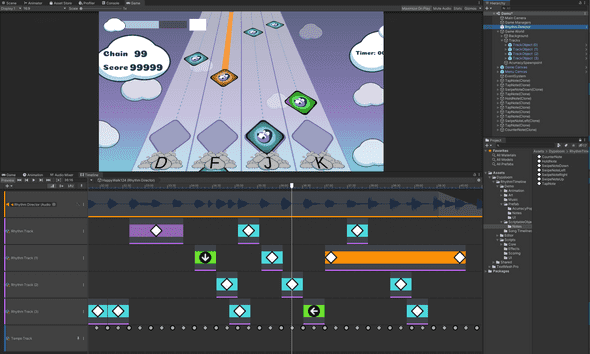
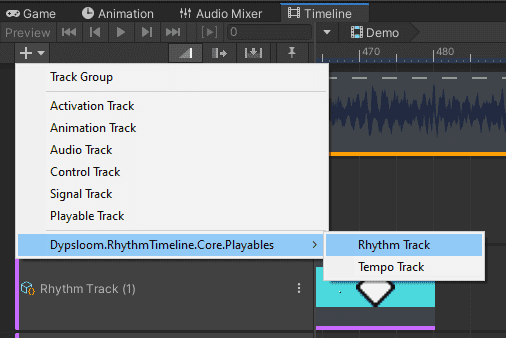
It is recommended to add at least one AudioTrack, and as many RhythmTracks as wanted (it must match the amount of Track Objects referenced by the Rhythm Director in the scene) and a Tempo Track.
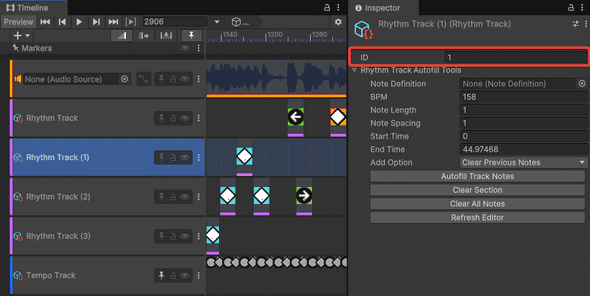
Rhythm Tracks must have IDs assigned to them.
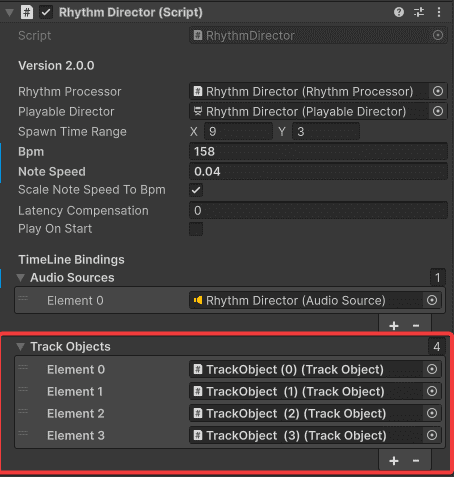
These IDs are used to match the index of the TrackObject in the RhythmDirector.
The Audio Track will play the music, you may even combine multiple songs together, ease in and out, etc… The editor even shows the Audio waveform, which helps setup the notes in the correct place. Note that the sound happen a little bit after it is shown in the waveform due to the timeline syncing with the Digital Signal Processing (DSP) clock.
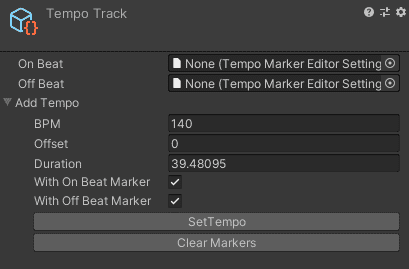
The Tempo Track is highly recommend but not required. It helps the Rhythm Clips to snap in the correct place if you wish to have a somewhat consistent BPM.
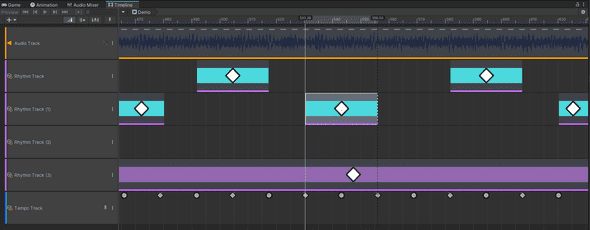
The Tempo can be set in the Track inspector. By default it is automatically set to draw the tempo using the BPM of the Rhythm Timeline Asset.
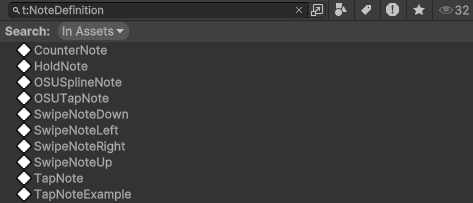
Finally you may start adding Rhythm Clips to the Rhythm Tracks. This can be done either by right-click on the Track and pressing “Add From Note Definition” or simply by drag & dropping the Note Definition scriptable objects on Track. The Note Definitions from the Demo can be found in “Assets/Dypsloom/RhythmTimeline/Demos/PenguinTracks/ScriptableObjects/Notes” or you can use the search bar to find all NoteDefinition in the project by writing “t:NoteDefinition”
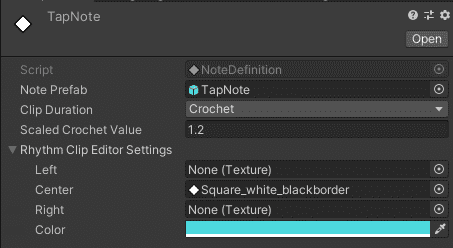
Once Rhythm Clips exist on any track you may copy paste them and move them around to your pleasing. Clips can be easily customized visually using the Note Definition inspector.
If everything is setup correctly you will see the notes previewed in the Game view when using the timeline play button or while moving around the Timeline playhead.
To learn more about Timeline check the Unity documentation: https://docs.unity3d.com/Packages/com.unity.timeline@1.8/manual/index.html
Especially read the playback controls which have some great tips to work on your timelines: https://docs.unity3d.com/Packages/com.unity.timeline@1.8/manual/tl-play-ctrls.html
Notes and Note Definitions
The Note Definition is a scriptable object which references a Note prefab. It is used on Rhythm Clips to know what the clip should look like in the Editor and what note should be spawned.
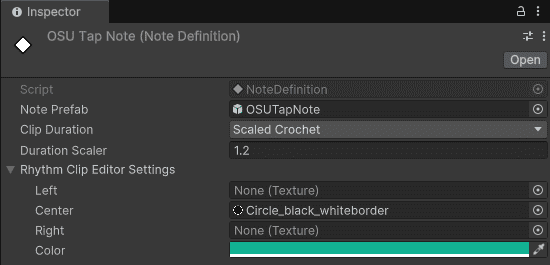
The Note Definition also has a way of limiting the clip duration to match the bpm or a fraction of it. The clip can also be set to free or a fixed time (in Duration Scaler seconds)
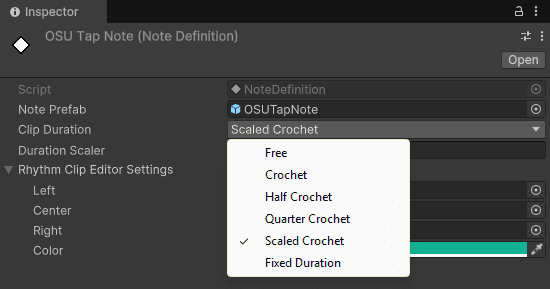
The Note Definition can be dragged and dropped in the timeline editor to place notes. It also has fields to customize the look of the clip within the Editor.
Notes are components which update with the timeline and sync to the DSP. By default our system comes with the following Note types:
- Tap Note
- Hold Note
- Swipe Note
- Counter Notes
- OSU Tap Note
- OSU Spline Note
- VR Trigger Note
- VR Sliceable Note
All notes inherit from the same base class Note. The Note class deals with events that initialize it and updates over time, whether it is from the timeline or Monobehavior Update event.
Notes a Spawned by the Rhythm Processor and they are pooled. Pooling object means they are reused once deactivated, they are never destroyed completely, just hidden until they are needed again.
Therefore Notes have multiple states:
- Disabled : They are not used
- Pre-Active : The note is moving but is not yet interactable
- Active : The note can be interacted with
- Post-Active : The note used to be interactable but no longer is.
The movement of each Note is usually defined to start a the Track Object start point and be on the perfect timing at the end point. This is easily customizable by creating a custom note. For example the OSU notes are spawned in a specified position defined on each clip instead of the track start point.
By default all notes have the following paramters:
- Update With Timeline: If set to false the Note will be updated using the rhythm director start DSP time as single truth, instead of the timeline current time.
- Activate With Clip: If set to false the Note will activate with time which will give more precision.
- Activate Deactivate Time Offset: By default the activate time is the clip start, the deactivate time is clip end. This variable can add a time offset to the activate and deactivate events. Especially useful when using a FixedDuration Note Definition.
- Orient To Track: Orient the rotation of the Note to match the track rotation?
- Set Active While Clip Active: The game object to set active while the clip is running.
Here is more detail on the 4 default notes. For OSU and VR notes please refer to their relevant section in the documentation.
Tap Note
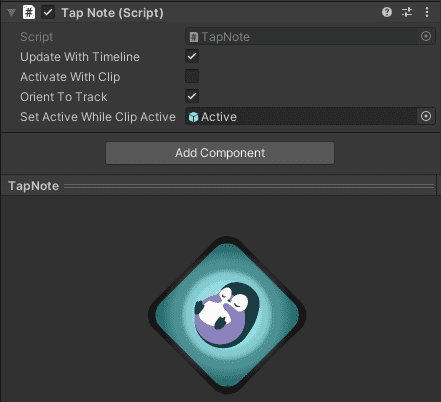
The tap note detects a single press input. The perfect timing is to press in center of the clip. Therefore it is recommended to combine it with a Note Definition that limits the clip size to a Crochet.
Hold Note
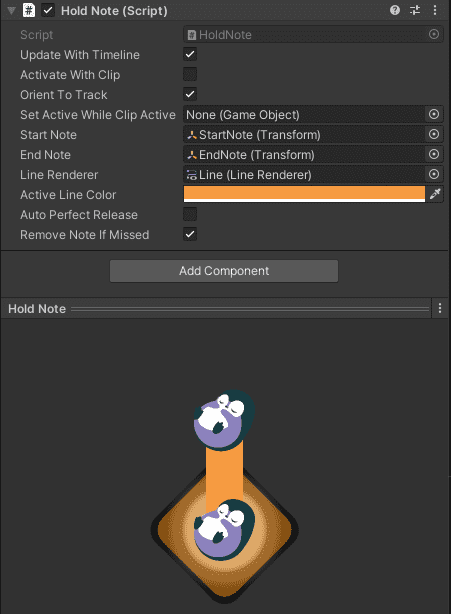
The hold note detects two input, press and release. Both need to match exactly the right timings.
The perfect timing is to press in the clip half a crochet after the clip start and half a crochet before the clip end.
Therefore it is recommended to combine it with a Note Definition that does not limit the clip size. Setting the Clip Duration to “Free”
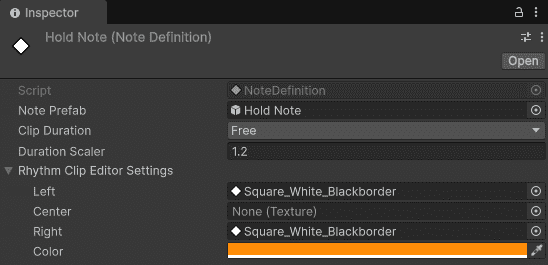
There are options to allow the hold note to be triggered automatically at the end without needing to release it manually at the perfect time.
Swipe Note
The Swipe Note detects a swipe input with a certain direction. The perfect timing is to press in center of the clip. Therefore it is recommended to combine it with a Note Definition that limits the clip size to a Crochet.
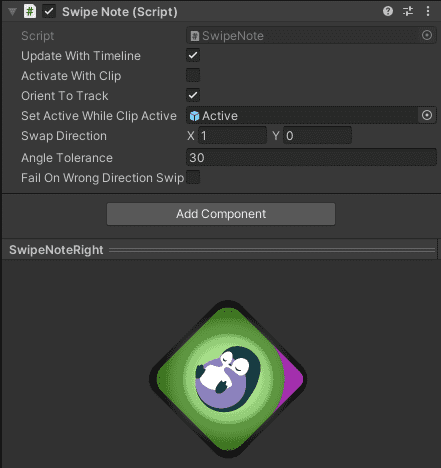
Counter Note
The counter Note needs to be The perfect timing is to press in the clip half a crochet after the clip start and half a crochet before the clip end. Therefore it is recommended to combine it with a Note Definition that does not limit the clip size.
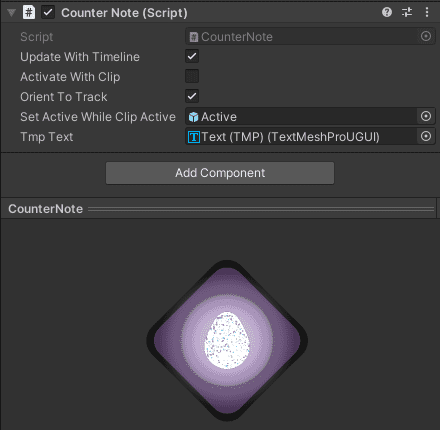
The counter number can be customized per clip instead of per prefab. This allows for much easier iteration. Simply edit the Integer parameter of the Rhythm Clip
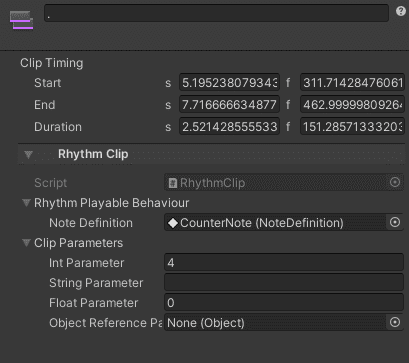
These values can be retrieved easily within the custom Note scripts via the Rhythm Clip Data property.
Custom Notes
Creating custom notes is very easy. Simply inherit from the Note class and override the functions you are interested in.
The code below shows an example of a Tap Note. The comments on the functions explain in detail when they are called and why.
/// <summary>
/// The Tap Note detects a single press input.
/// </summary>
public class TapNote : Note
{
    /// <summary>
    /// The note is initialized when it is added to the top of a track.
    /// </summary>
    /// <param name="rhythmClipData">The rhythm clip data.</param>
    public override void Initialize(RhythmClipData rhythmClipData)
    {
        base.Initialize(rhythmClipData);
    }

    /// <summary>
    /// Reset when the note is returned to the pool.
    /// </summary>
    public override void Reset()
    {
        base.Reset();
    }

    /// <summary>
    /// The note needs to be activated as it is within range of being triggered.
    /// This usually happens when the clip starts.
    /// </summary>
    protected override void ActivateNote()
    {
        base.ActivateNote();
    }
    /// <summary>
    /// The note needs to be deactivated when it is out of range from being triggered.
    /// This usually happens when the clip ends.
    /// </summary>
    protected override void DeactivateNote()
    {
        base.DeactivateNote();

        //Only send the trigger miss event during play mode.
        if(Application.isPlaying == false){return;}

        if (m_IsTriggered == false) {
            InvokeNoteTriggerEventMiss();
        }
    }
    /// <summary>
    /// An input was triggered on this note.
    /// The input event data has the information about what type of input was triggered.
    /// </summary>
    /// <param name="inputEventData">The input event data.</param>
    public override void OnTriggerInput(InputEventData inputEventData)
    {
        //Since this is a tap note, only deal with tap inputs.
        if (!inputEventData.Tap) { return; }

        //The game object can be set to active false. It is returned to the pool automatically when reset.
        gameObject.SetActive(false);
        m_IsTriggered = true;

        //You may compute the perfect time anyway you want.
        //In this case the perfect time is half of the clip.
        var perfectTime = m_RhythmClipData.RealDuration / 2f;
        var timeDifference = TimeFromActivate - perfectTime;
        var timeDifferencePercentage =  Mathf.Abs((float)(100f*timeDifference)) / perfectTime;

        //Send a trigger event such that the score system can listen to it.
        InvokeNoteTriggerEvent(inputEventData, timeDifference, (float) timeDifferencePercentage);
        RhythmClipData.TrackObject.RemoveActiveNote(this);
    }
    /// <summary>
    /// Hybrid Update is updated both in play mode, by update or timeline, and edit mode by the timeline.
    /// </summary>
    /// <param name="timeFromStart">The time from reaching the start of the clip.</param>
    /// <param name="timeFromEnd">The time from reaching the end of the clip.</param>
    protected override void HybridUpdate(double timeFromStart, double timeFromEnd)
    {
        //Compute the perfect timing.
        var perfectTime = m_RhythmClipData.RealDuration / 2f;
        var deltaT = (float)(timeFromStart - perfectTime);

        //Compute the position of the note using the delta T from the perfect timing.
        //Here we use the direction of the track given at delta T.
        //You can easily curve all your notes to any trajectory, not just straight lines, by customizing the TrackObjects.
        //Here the target position is found using the track object end position.
        var direction = RhythmClipData.TrackObject.GetNoteDirection(deltaT);
        var distance = deltaT * m_RhythmClipData.RhythmDirector.NoteSpeed;
        var targetPosition = m_RhythmClipData.TrackObject.EndPoint.position;

        //Using those parameters we can easily compute the new position of the note at any time.
        var newPosition = targetPosition + (direction * distance);
        transform.position = newPosition;
    }
}
The “RhythmClipData” property has a lot of very useful information about the clip that is bound to the note. It is extremely useful if you plan to create your own notes.
You may easily customize Note to function exactly as you wish by overriding those functions.
Here are some ideas of custom notes which could be created by you
- Notes which rotate while going down the track
- Notes which gives you extra points when pressed
- Note that combines hold with swipe
These are just examples, with a bit of creativity any type of notes are possible.
Apart from customizing notes directly you may also customize the Track Object code to tell the notes trajectory at any given time.
Custom data per clip
In some cases you may want to create a single note prefab and note definition, but have each note clip in the timeline have it’s own data.
The “CounterNote” is a simple example of that. using the RythmClipParameter to set how many times it needs to be pressed.

In some cases though you may need additional data types not available by default in the RhythmClipParameters. That’s when you’ll want to use a RhythmClipExtraNoteData. You can find a working example of that in the OSU demo, where we made a OsuSplineNoteRhythmClipExtraData that contains the spline Data for that clip.
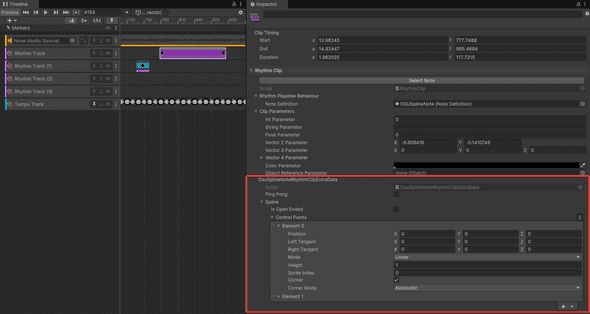
To make your own you’ll need a few things
- A custom note
- A custom RhythmClipExtraNoteData
- In the custom Note script override RhythmClipExtraDataType property to return your custom RhythmClipExtraNoteData
/// <summary>
/// This function returns the RhythmClipExtraNoteData Type to assign to the RhythmClip when added to the timeline.
/// </summary>
public override Type RhythmClipExtraNoteDataType => typeof(YourCustomNoteRhythmClipExtraData);- In The Intialize or HyrbidUpdate function use your custom RhythmClipExtraNoteData to make your note unique for that clip
if (m_RhythmClipData.ClipParameters.RhythmClipExtraNoteData is YourCustomNoteRhythmClipExtraData extraNoteData) {
    //use your extraNoteData!
}- Optionally you may want to inherit INoteRhythmClipOnSceneGUIChange or INoteOnSceneGUIChange and define a RhythmClipOnSceneGUIChange or OnSceneGUIChange function (inside UNITY_EDITOR compilation condition) to sync your data with the note in the editor preview.
We use RhythmClipOnSceneGUIChange and OnSceneGUIChange in the OSU notes for example, to move the notes with a handle in the scene view and sync the sprite shapes data from the scene inside the clip. The following code is slightly simplified but shows the basics:
// Make sure to inherit the INoteRhythmClipOnSceneGUIChange and INoteOnSceneGUIChange to receive the callbacks
public class YourCustomNote : Note, INoteRhythmClipOnSceneGUIChange, INoteOnSceneGUIChange
    {
        ... Your note code

#if UNITY_EDITOR
        public virtual bool RhythmClipOnSceneGUIChange(UnityEditor.SceneView sceneView, RhythmClip mainSelectedClip,
            List<RhythmClip> selectedClips)
        {
            var rhythmClipData = mainSelectedClip.RhythmClipData;
            if (rhythmClipData.IsValid == false) { return false;}

            var trackObject = rhythmClipData.TrackObject;
            if (trackObject == null) { return false; }

            UnityEditor.EditorGUI.BeginChangeCheck();

            //Example of showing editor handle to edit the Vector2 parameter
            var clipOffset = mainSelectedClip.ClipParameters.Vector2Parameter;
            var noteOriginalPosition = trackObject.EndPoint.position + new Vector3(clipOffset.x,clipOffset.y,0);
            Vector3 newTargetPosition = UnityEditor.Handles.PositionHandle(noteOriginalPosition, Quaternion.identity);


            if (UnityEditor.EditorGUI.EndChangeCheck())
            {
                //Record the change on the clip and in undo if there was one.
                var deltaPos = newTargetPosition - noteOriginalPosition;

                if (deltaPos == Vector3.zero)
                {
                    return false;
                }

                foreach (var otherRhythmClip in selectedClips)
                {
                    UnityEditor.Undo.RecordObject(otherRhythmClip, "Change Target Position");
                    otherRhythmClip.ClipParameters.Vector2Parameter += new Vector2(deltaPos.x, deltaPos.y);
                }

                return false;
            }

            return false;
        }

        public virtual bool OnSceneGUIChange(SceneView sceneView)
        {
            if (m_RhythmClipData.IsValid == false) { return false;}

            // Get the custom extra data and synchronize the data inside the clip when the scene changes.
            if (m_RhythmClipData.ClipParameters
                    .RhythmClipExtraNoteData is OsuSplineNoteRhythmClipExtraData extraNoteData) {

                extraNoteData.PingPong = PingPong;
                SpriteShapeControllerSynchronizer.SyncSplineData(m_MainSpline.ShapeController.spline, extraNoteData.spline);

                EditorUtility.SetDirty(extraNoteData);
            }

            return false;
        }
#endif
    }
For pratical examples of these implementation have a look at the source code of the OSUNoteBase and OSUSplineNote where you will find a lot of interesting things, like how to set your own editor scene view handles to more intuitively edit values in the editor. And how to keep everything synced in editor preview.
Note Clip Generator
Note clip generators are scriptable objects you can use to quickly populate Rhythm Timeline tracks.
You can create one like so:
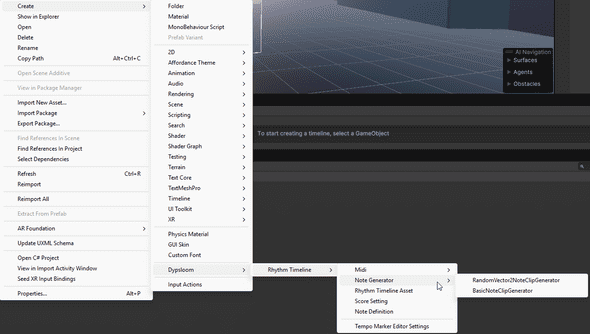
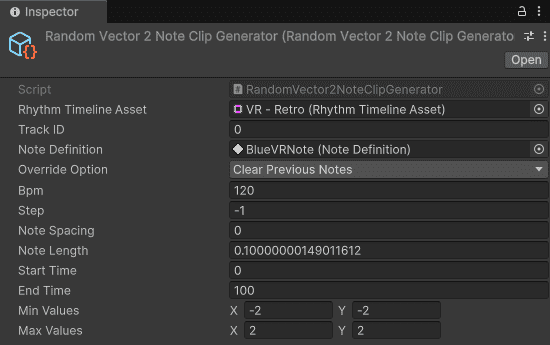
Not generators that auto set note clip paramters are quite useful as those cannot be set in the prefab. For example the RandomVector2NoteClipGenerator is useful in VR scene to simply set random placement of notes without having to manually set them one by one.
You can then set the Rhythm Timeline and specify the track id to spawn the Note Definitions too.
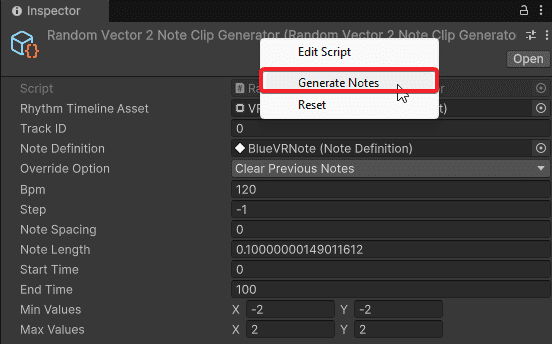
To generate the notes all you need is to right-click the inspector header and press “Generate Notes”
API
You should definetly consider making your own custom note generators if you make custom notes. Or use the Midi to Timeline settings.
It’s simple to make. For example this is the RandomVector2NoteClipGenerator
/// <summary>
/// This object is used to generate a note clips inside the rhythm timeline.
/// Inherit this class to make your own note clip generator.
/// You can use this generator in the Midi to Rhythm Timeline tool.
/// </summary>
[CreateAssetMenu(fileName = "RandomVector2NoteClipGenerator", menuName="Dypsloom/Rhythm Timeline/Note Generator/RandomVector2NoteClipGenerator")]
public class RandomVector2NoteClipGenerator : BasicNoteClipGenerator
{
    public Vector2 MinValues;
    public Vector2 MaxValues;

    public override RhythmClip GenerateClip(RhythmTrack rhythmTrack, double clipStart, double clipDuration,
        NoteDefinition noteDefinition, GenerateClipOverrideOption overrideOption = GenerateClipOverrideOption.ClearPreviousNotes)
    {
        var rhythmClip = base.GenerateClip(rhythmTrack, clipStart, clipDuration, noteDefinition,overrideOption);

        rhythmClip.ClipParameters.Vector2Parameter = new Vector2(Random.Range(MinValues.x, MaxValues.x), Random.Range(MinValues.y, MaxValues.y));
        return rhythmClip;

    }
}
Rhythm Director
The Rhythm Director component is the most important component in the system. It controls the Playable Director to binding the Rhythm Tracks to Track Objects and makes sure the Rhythm Timeline Asset can be previewed in Edit mode. Rhythm Timeline Assets must be opened in the Rhythm Director Playable Director to be previewed in edit more.
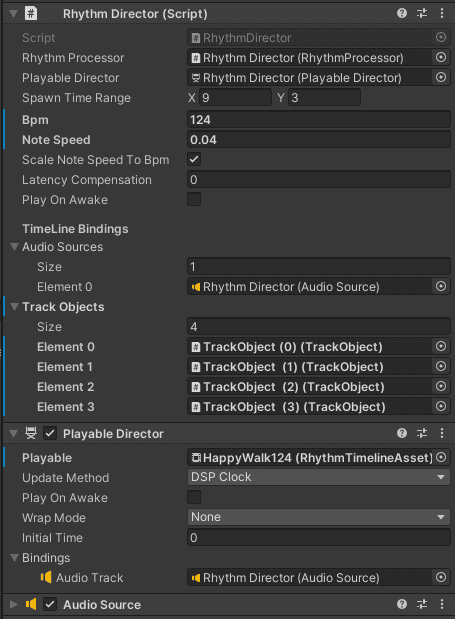
The Track Objects must be referenced in the Rhythm Director. The number must match the number of Rhythm Tracks within the Rhythm Timeline Asset.
The Spawn Time Range field determines how many seconds the notes must be spawned in the scene before the clips starts and how many seconds it should wait after the end of clip to remove the note.
The Note speed may be defined on the Rhythm Director or directly on the Rhythm Timeline Asset.
The Latency compensation delays the audio compared to the notes. This is useful in case the different devices used have a slight difference of latency between the image and the sound.
API
//Get the Rhythm Director from anywhere using the Toolbox.
m_RhythmDirector = Toolbox.Get<RhythmDirector>();

//Play a song from a Rhythm Timeline Asset
m_RhythmDirector.PlaySong(rhythmTimelineAsset);

//Pause the song
m_RhythmDirector.Pause()

//Unpause the song
m_RhythmDirector.UnPause()

//End the song.
m_RhythmDirector.EndSong()
Rhythm Processor
The Rhythm Processor is used to create the Notes and return them to the pool when done. It also processes all the Note and Input events and broadcast them everywhere else.

API
//Get the Rhythm Director from anywhere using the Toolbox.
m_RhythmDirector = Toolbox.Get<RhythmDirector>();

//Get the Rhythm Processor from the Rhythm Director.
m_RhythmProcessor = m_RhythmDirector.RhythmProcessor;

//Trigger an input
m_RhythmProcessor.TriggerInput(inputEvent);
Track Object
The Track Object is used to define the start and end point where the notes should go through. It may also define the path it takes from one point to the other.
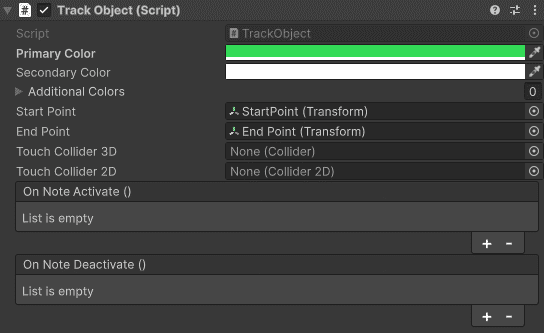
The touch collider are defined on the Track Object. You may use both 2D and 3D colliders. These can be optionally be used by the Input Manager. In certain demos like OSU and VR the “input” triggers directly on the notes instead of the tracks
It is very useful to add Event Receiver components on the track to detect input and note events. With the Event Receivers you can play sounds, animate something, spawne effects, etc…
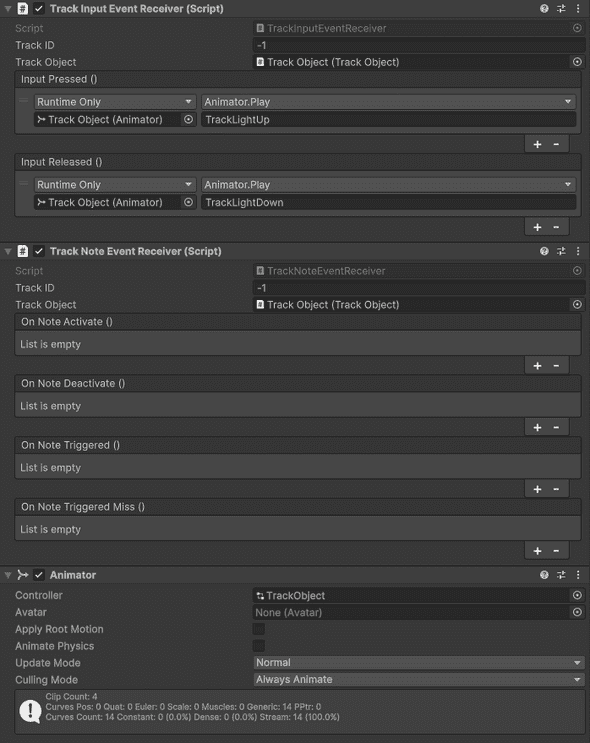
API
//Get the Track Objects from the RhythmDirector.
var trackObject = m_RhythmDirector.TrackObjects[0];

//Set the active note, this adds the note to be detected by input in the Rhythm Processor.
endPoint.SetActiveNote(note);

//Remove the note from being active.
endPoint.RemoveActiveNote(note);

//Get the start point.
var start = trackObject.StartPoint;

//Get the end point.
var endPoint = trackObject.EndPoint;

//Get the not direction a delta T
var noteDirection = endPoint.GetNoteDirection(deltaT);
Input
You will notice how each demo scene has it’s own input component. They all support both the Old and new Unity input system:
- Penguin Tracks - Rhythm Input Manager : This input component works triggering input events to the current “active” note of a track. Each track has a key assigned to it.
It is recommended to use 3D Touch Collider as it works both in perspective and orthogonal camera modes.
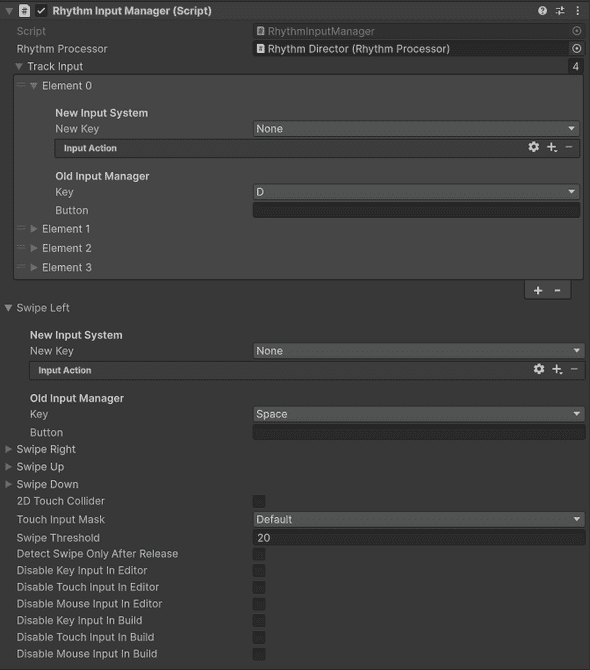
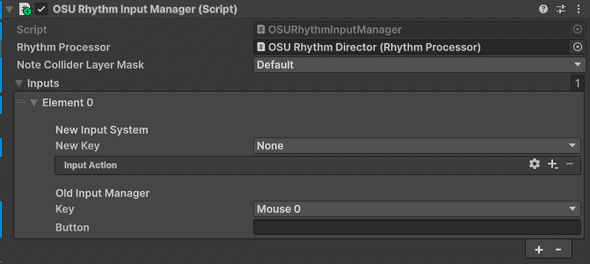
- OSU - OSU Rhythm Input Manager : This input component uses a single key (mouse0 by default) and triggers the input event on the note that is bellow the mouse cursor by using a raycast
- OpenXR_VR - VR Rhythm Input Manager : This component takes in a list of “VR Input Triggers” which detect when objects collide/trigger note colliders
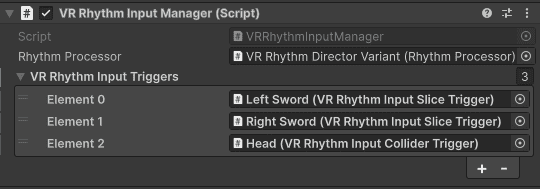
All these Input Manager components transforms player input in an “InputEventData” which is sent to the RhythmProcessor
This means it is quite straight forward to replace those component for another one that uses the Input system you like. Simply call the Trigger Input function on the Rhythm Processor to process your input.
var inputEventData = new InputEventData();
inputEventData.Note = note;
inputEventData.InputID = inputID;
inputEventData.TrackID = trackID;
inputEventData.Direction = direction;
m_RhythmProcessor.TriggerInput(inputEventData)
You can inherit InputEventData with your own custom class and add more data to it.
public class YourInputEventData : InputEventData
{
    public int extraData;
    // Add more data you need
}
For example, the OSU and VR demos use their own custom input manager and inputEventData allowing you to pass in more relevant information about the input to the note. The note of course need to be custom to take the extra information and deal with it accordingly.
/// <summary>
/// An input was triggered on this note.
/// The input event data has the information about what type of input was triggered.
/// </summary>
/// <param name="inputEventData">The input event data.</param>
public override void OnTriggerInput(InputEventData inputEventData)
{
    var yourInputEventData = inputEventData as YourInputEventData;

    if (yourInputEventData == null) {
        Debug.LogError("The input event used is not compatible with Your Notes");
        return;
    }

    //Use your extra data here...
}
Score Manager
The Score Manager listens to events from the Rhythm Processor to know when notes have been triggered.
It uses the Score Setting scriptable object to find how accurate the press was and attribute the correct score as well as spawn a pop up.
Ranks (S, A, B, etc…) are also defined on the Score Setting.
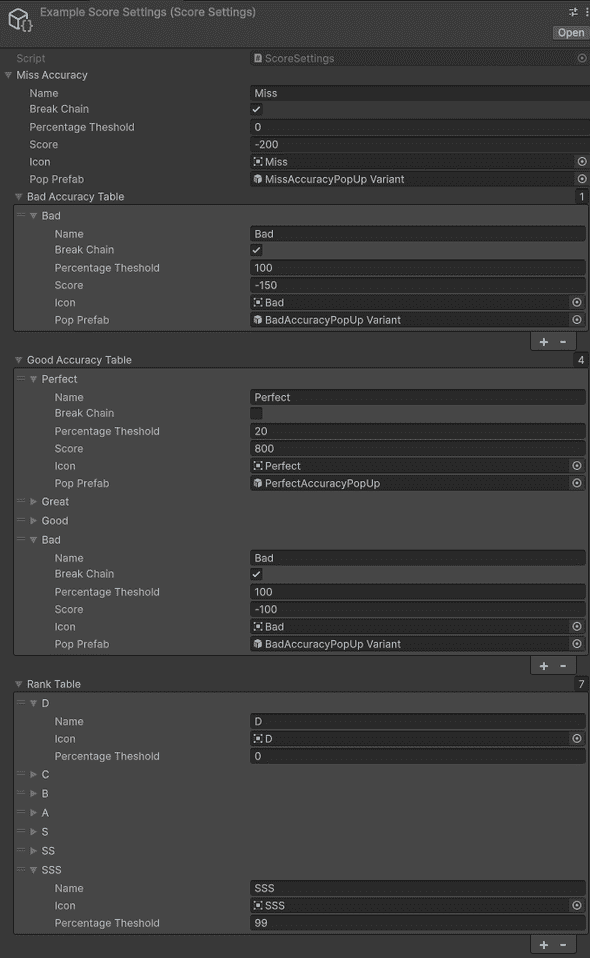
The Bad Accuracy Table and Good Accuracy Table allow you to give different levels of accuracy using the Percentage Threshold. The Percentage Threshold is the percentage of accuracy from a perfect timing (i.e center of tap note clip to its edges, start/end clip) where 0 is perfect and 100 is completely off time.
The Bad Accuracy is their in the case you have custom notes which should not be triggered (i.e mines or dodge blocks in the VR demo)
The Score Manager component has many fields to set Text fields and sliders to display the score while playing a song.
To create a new Score Setting right-click in the project view and press Dypsloom -> RhythmTimeline -> Score Setting.
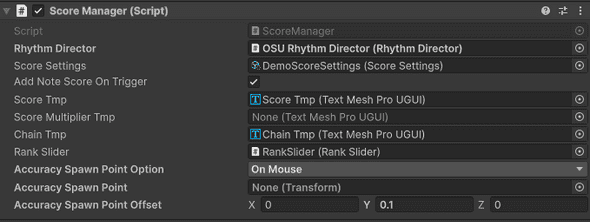
The Score Manager and Score Settings are quite flexible and allow many different set ups that should accommodate most users. But in some cases you may want more. As the Score Settings is separate from the main core systems it can easily be replaced by your own custom score manager if required.
API
//Get the Score Manager from anywhere using the Toolbox.
m_ScoreManager = Toolbox.Get<ScoreManager>();

//Get the score data of the current song.
var scoreData = m_RhythmProcessor.GetScoreData();

//Get the note accuracy using the offset percentage and a bool for whether or not the note was missed.
var noteAccuracy = m_RhythmProcessor.GetAccuracy(offsetPercentage, miss);

//Add score using the note and note accuracy
m_RhythmProcessor.AddNoteAccuracyScore(note, noteAccuracy);

//Add score unrelated to a specific note
m_RhythmProcessor.AddNoteAccuracyScore(score);

//Get values for rank, score, chain as units or percentages
var chain = m_RhythmProcessor.GetChain();
var chainPercentage = m_RhythmProcessor.GetChainPercentage();
var maxChain = m_RhythmProcessor.GetMaxChain();
var maxChainPercentage = m_RhythmProcessor.GetMaxChainPercentage();
var score = m_RhythmProcessor.GetScore();
var scorePercentage = m_RhythmProcessor.GetScorePercentage();
var rank = m_RhythmProcessor.GetRank();
Save Manager
The Save Manager allows you to save the songs high score to disk. The high scores are saved on the Rhythm Timeline Asset scriptable object. scriptable objects values are stored during development even when changed at runtime. But values do not persist once the game is built. Therefore the values must be stored on disk such that they may be saved while playing on a release build on a device. The Save Manager converts the high score data of all songs into Json and then into binary. The binary data is then saved on disk as a save file. When loading, the save manager does the same in reverse.

The Save Manager listens to an event on the Score Manager to know when a new high score was made to know when it should save to disk. You may also automatically load on start.
For Debugging purposes, there is an option to print a copy of the save file in a readable Json format.
Some context menu items are available when right-clicking the Save Manager Component (or when pressing the three dots on the top right of the component)
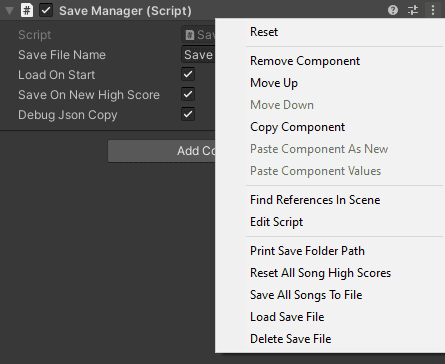
- Print Save Folder Path: This prints in the console, the path to the folder where the save file will be saved.
- Reset All Song High Scores: Resets all the high scores for the songs that are referenced in the Rhythm Game Manager.
- Save ALl Songs To File: Save all songs referenced by the Rhythm Game Manager to disk.
- Load Save File: Load the save file by updating the high scores of matching songs.
- Delete Save File: Delete the save file.
The Save Manager was designed to only save the high score of the songs. It is recommended to either replace it or build on top of it to allow saving other data specific to your game too.
It is important to know that converting Json to binary is not a secure encryption solution and therefore it is advised to only save data that is relevant to the game and that does not matter if hacked. You may edit or replace the Save Manager to add encryption to your save file.
API
//Get the Save Manager from anywhere using the Toolbox.
m_SaveManager = Toolbox.Get<SaveManager>();

//Return the save folder path.
var saveFolderPath = m_SaveManager.GetSaveFolderPath();

//ResetAllSongHighScores
m_SaveManager.ResetAllSongHighScores();

//Save all song high score to file.
m_SaveManager.SaveAllSongsToFile();

//Load Save File.
m_RhythmProcessor.LoadSaveData();

//Delete From Disk.
m_RhythmProcessor.DeleteFromDisk();

//Save a specific song and then save to disk.
m_RhythmProcessor.SaveSong(song);
Event Receivers
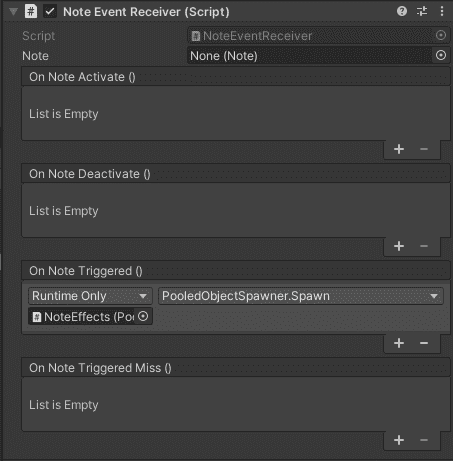
The event receivers are very simple components that listen to events in the system and Invoke Unity Events which can be setup in the inspector.
They are extremely useful to quickly customize your scene, make it more interactive and lively.
All those component can be found under the Dypsloom/RhythmTimeline/Scripts/EventReceivers folder.
Some of the included are Event Receiver for:
- Note : detect events on a note
- Score : detect events when the score changes
- Song : detect events when the song plays or ends
- Track Input : detect inputs on tracks
- Track Note : detect notes on tracks
Here is an example of the Note Event Receiver
Utility Scripts
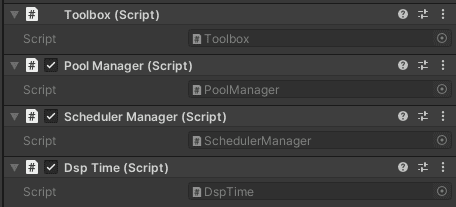
The system has a few very useful utility scripts
- Toolbox : Register and get any object from anywhere using the Toolbox
- Pool Manager : Automatically pools objects to improve performance
- Dsp Time : Get the Dsp Time or the adaptive Dsp Time from anywhere
- Scheduler : Invoke functions after a certain delay
Toolbox
The toolbox can be thought of a master singleton. instead of having many singletons in the system which can easily get out of hand. Having a single centralized singleton which manages all object is much easier to control.
Use this feature with care over relying on it will make your code hard to test outside of play mode.
// Register an object with an ID, by default that ID is 0
Toolbox.Set<MyObjectType>(myObject, objectID);

// Get that object anywhere using the Get function.
var myObject = Toolbox.Get<MyObjectType>(objectID);
Pool Manager
The pool manager automatically pools objects, it allows you to easily create pools of any game object prefab.
// Create a pooled instead of a prefab game object.
var pooledInstance = PoolManager.Instantiate(myPrefab);

// Return the pooled instance to the pool to be reused later.
PoolManager.Destroy(pooledInstance);
DSP Time
Digital Signal Processing time is not constant with the frame time. It can sometimes stay the same for multiple frames. The DSP Time component estimates an adaptive time by taking the last DSP time and adding the delta Time of all the frames where the Internal DSP time did not change. This gives a smoother interpolation when moving objects per frame in sync with the DPS time.
// Get the adaptive time.
var adaptiveDSPTime = DSPTime.AdaptiveTime;

// Get the rea DSP time.
var dspTime = DSPTime.Time;
Scheduler Manager
The scheduler is used to invoke functions delayed in seconds using coroutines.
// Delayed function call
SchedulerManager.Schedule(MyFunction, delay);
OSU
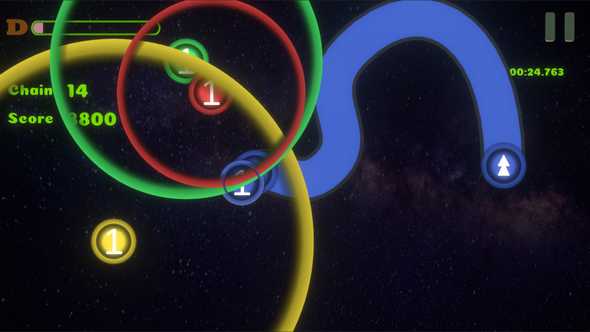
The OSU demo is inspired by the popular rhythm game OSU
In this demo the note positions are defined on each RhythmClip within the timeline. It even supports spline hold notes by taking advantage of the U2D package Sprite Shape Renderer and Sprite Shape Controller.
This demo showcases how you can expand Rhythm Timeline to achieve any kind of result you want taking advantage of RhythmClip Parameters, custom Notes scripts and custom input.
OSU Rhythm Input Manager
This component allows you to define input by raycasting from the mouse position to colliders directly on each note, instead of relying on one input per track.

OSU Tap Note
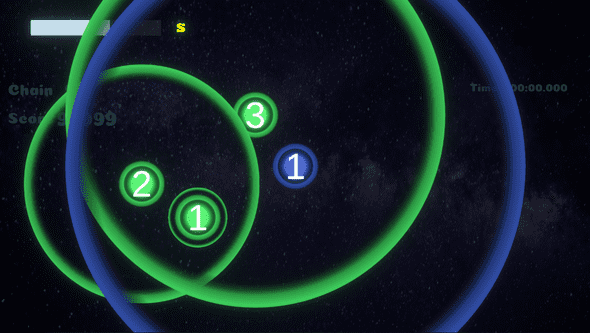
This component is used for simple OSU tap notes. The Circle Timing Outline scales down as you reach closer to the “perfect” timing to click
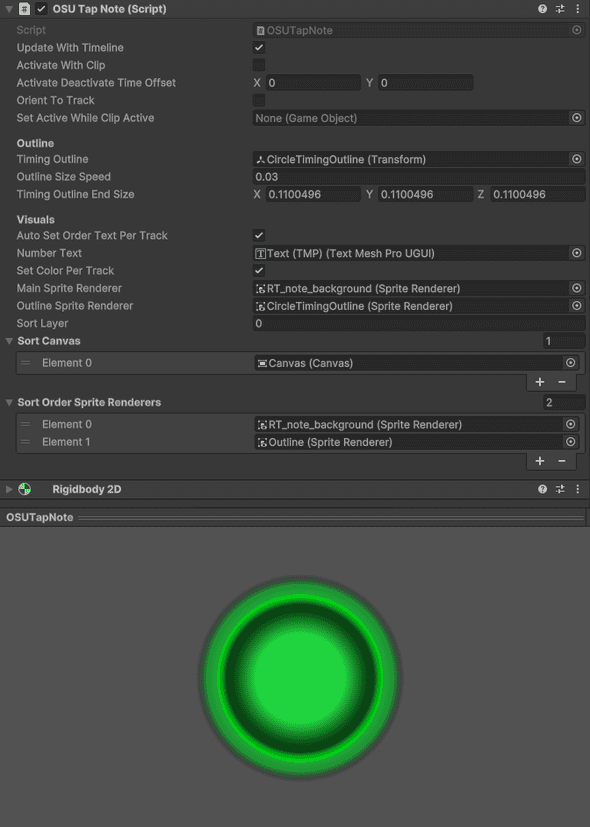
In osu notes can often overlay. New notes should always render below old ones. To ensure this works properly with sprites we use the “Sort Canvas” and “Sort Order Sprite Renderers” lists to define the order in which the visuals need to render. When spawned each canvas and sprite renderer is given a descending sort order from the notes order in the timeline. The first renderer of the first note will have the max sort order value (int16.Max). We have limited the number of renderers in the lists (combined) to 15 to simplify the dynamic sort order logic.
One special feature of OSU Notes is that it uses the Vector2 parameter of the RhythmClipParmeters to specify it’s position in the world
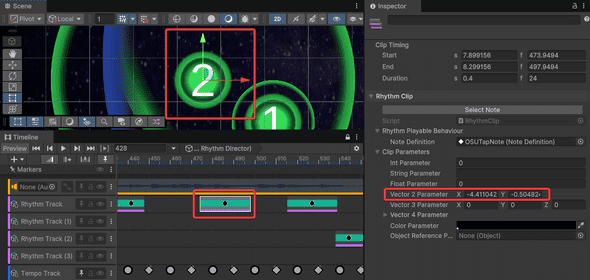
As you select the clip in the timeline you will notice a handle in the scene view that you can use to place the note very intutively.
We also automatically set the Color from the track primary color and text (Number) from consecutive clips on that track.
OSU spline Note
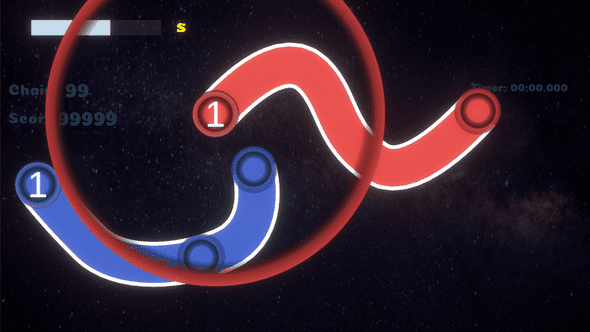
The Spline note allow you to use the Sprite Shape Renderer and Sprite Shape Controller to draw splined hold notes. I recommend checking the documentation on the Sprite Shape Renderer and Controller to learn more: https://docs.unity3d.com/Packages/com.unity.2d.spriteshape@10.0/manual/SSController.html
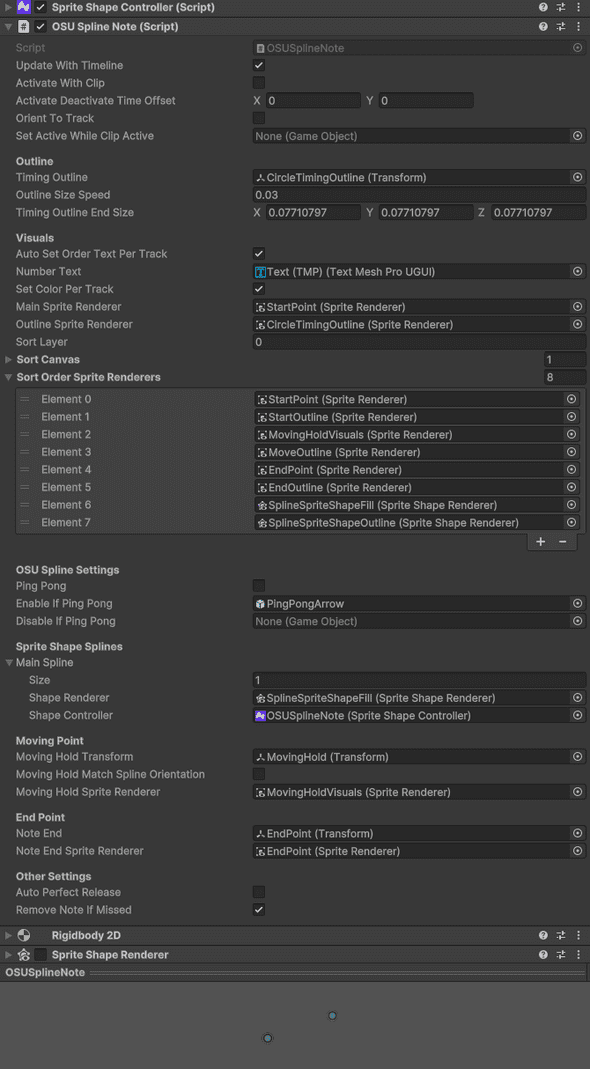
Just like the OSU tap notes you can place the note position using the scene view handle.
And of course you can edit the shape of the note while previewing the timeline. Here are the recommened steps to do so.
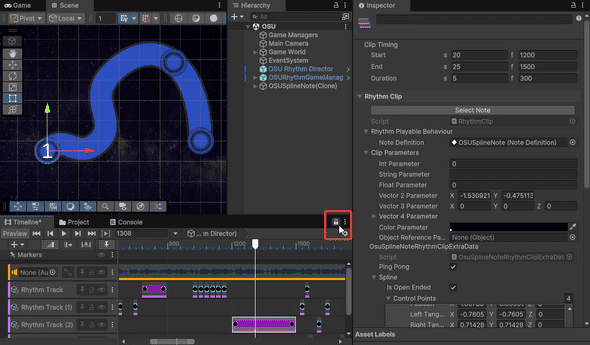
First Lock the timeline window. This ensures the timeline stays selected and continues to preview even if you select gameobjects other than the Playable Director
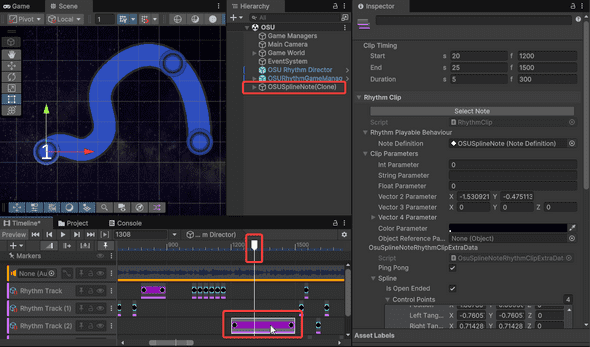
Ensure your play head is on your clip and the clip is selected. You should see your note gameobject in the scene.
For convinience there is a “Select Note” button on the Clip inspector. This is particuarly useful if you have a lot of notes in the scene and you don’t know which one is linked to the clip.
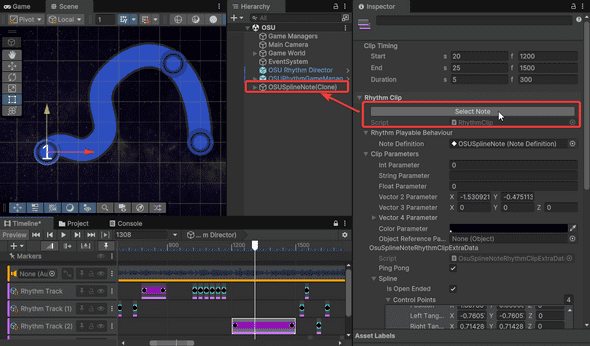
Pressing that button will select the note in the scene that is linked to the clip.
Then click on the “edit spline” button of the SplineShapeController to enable the spline editor tool
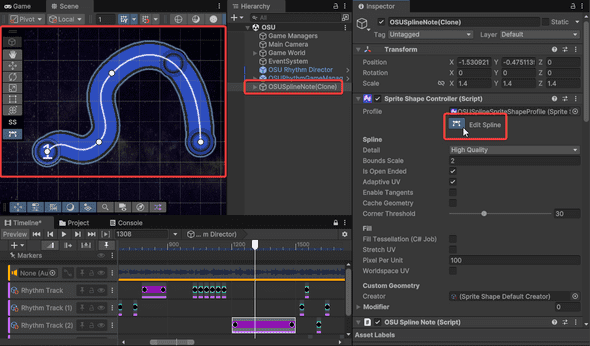
You can now edit your shape to your liking. And the SpriteShapeControl tools should appear in the scene view
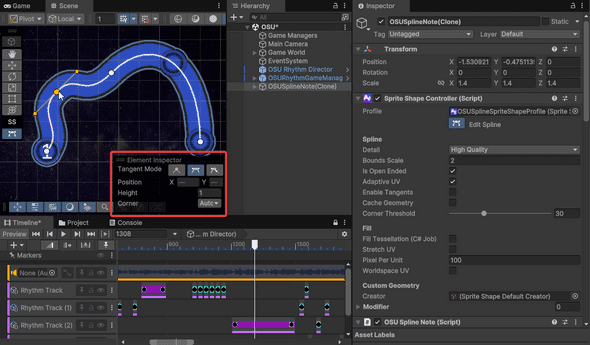
If you go back to your clip you’ll notice that the spline data was automatically saved on the clip using a custom “RhythmClipExtraNoteData”
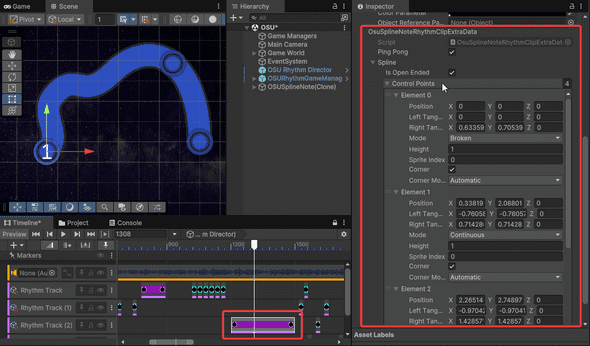
Similarly to the osu spline hold notes, you can also set whether the spline hold note is “pingpong” meaning it goes in reverse after reaching the end.
SpriteShapeControllerSynchronizer
SpriteShapeController has a limitation of one SpriteShapeRenderer
If you are interested in making your own shapes with a combination of multiple sprite shapes renderers. You will be interested in the “SpriteShapeControllerSynchronizer” component
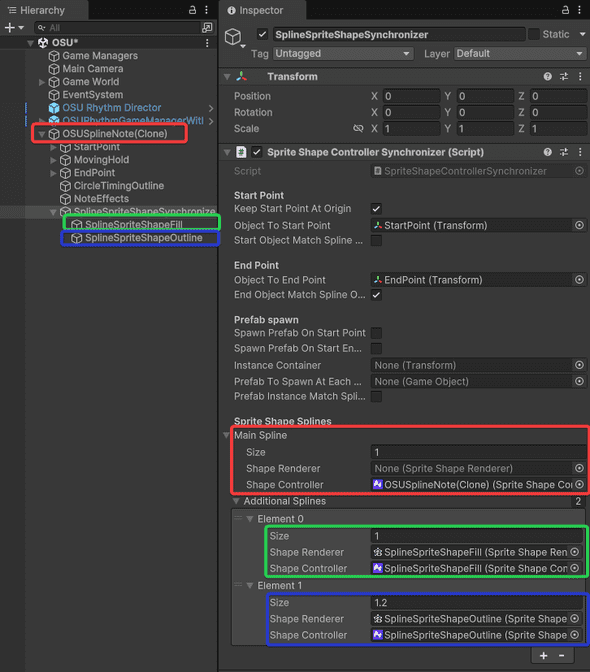
This component will use one main SpriteShapeController to control the other ones in the list. Conviniently you can also automatically set the height of the curve at each point. allowing you to easily create an outline or inline style look.
VR
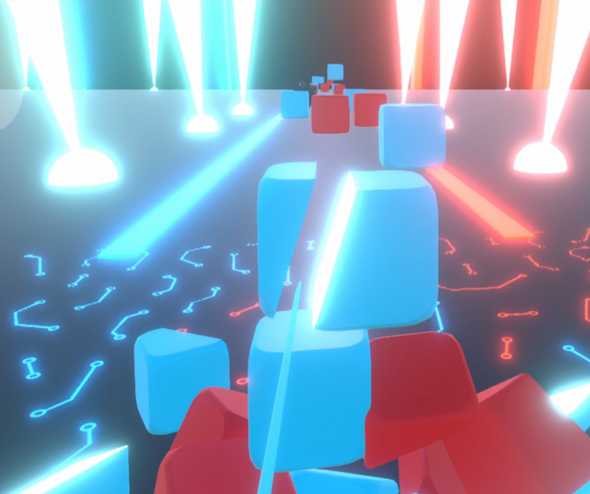
The OpenXR_VR demo is inspired by the popular rhythm game Beat Saber
The VR demo for Rhythm Timeline was built and tested for Meta Quest 3. Other headsets are not officially supported as we have no way of testing it directly ourselves. For this demo scene we decided to go with Unitys Meta OpenXR package since we are targetting Meta Quest specifically. Other VR/AR packages can work with Rhythm Timeline but we won’t have a demo scene available for those.
The following setup assumes you are setting up the VR demo for Meta Quest 3.
The VR demo showcases a gameplay in the style of “Beat Saber” one of the most popular Rhythm VR games in the world. Thanks to timeline you can make it your own by adding animated sequences, events and more to the timeline.
To slice the cubes we have chosen to use the open source package called ez-slice, instead of making our own as it comes with a lot of nice features (Thank you David Arayan for sharing this package): https://github.com/DavidArayan/ezy-slice
Setting up the headset
To get started with using VR with Rhythm Timeline you must first set your Quest 3 into developper mode. You can follow the steps from the official meta developer documentation: https://developers.meta.com/horizon/documentation/unity/unity-development-overview/
I recommend using the Link app to connect the headset to Unity and stream/play the game from editor play mode into the headset: https://developers.meta.com/horizon/documentation/unity/unity-env-device-setup#set-up-link
After downloading, installing and setting up your headset to your PC you can now start setting up the Unity project.
Setting up Unity for VR
You’ll need to download and install the following packages, from the package manager
Make sure to install the Open XR package to get started
- com.unity.xr.meta-openxr@2.0 V2.0.1+
- com.unity.xr.interaction.toolkit V3.0.7+
and their dependencies
You must download the starter Sample project from the Interaction Toolkit as some of the prefabs are used in our demo scene.
Once those packages are installed you can finally import the VR demo package from: Assets/Dypsloom/RhythmTimeline/Demos/OpenXR_VR
and open the VR demo scene “OpenXR_VR”
VR Demo components
The VR demo comes with components specific to triggering and cutting notes in VR.
VR Rhtyhm Input Manager & VR Rhythm Input Triggers
Very straight forward, this component takes in a list of VR Rhythme Input Triggers and manages interaction between the triggers and the notes

There are two RhythmInputTriggers
- VRRhythmInputColliderTrigger
- VRRhythmInputSliceTrigger
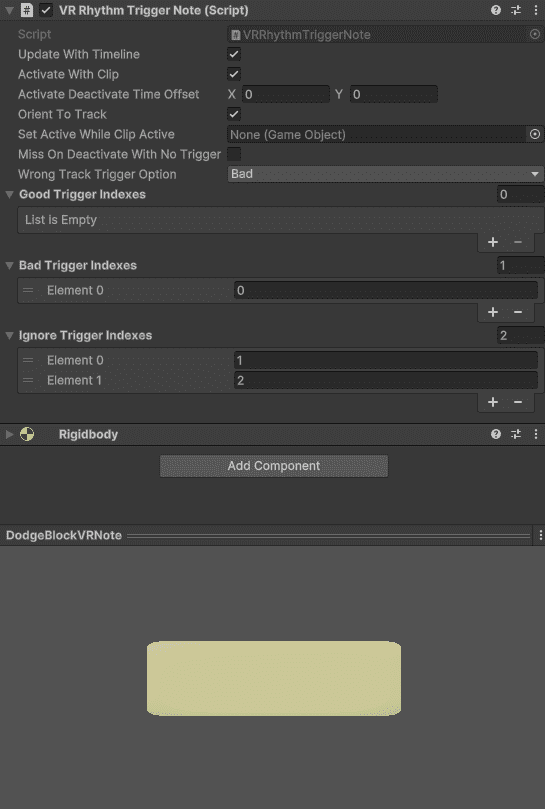
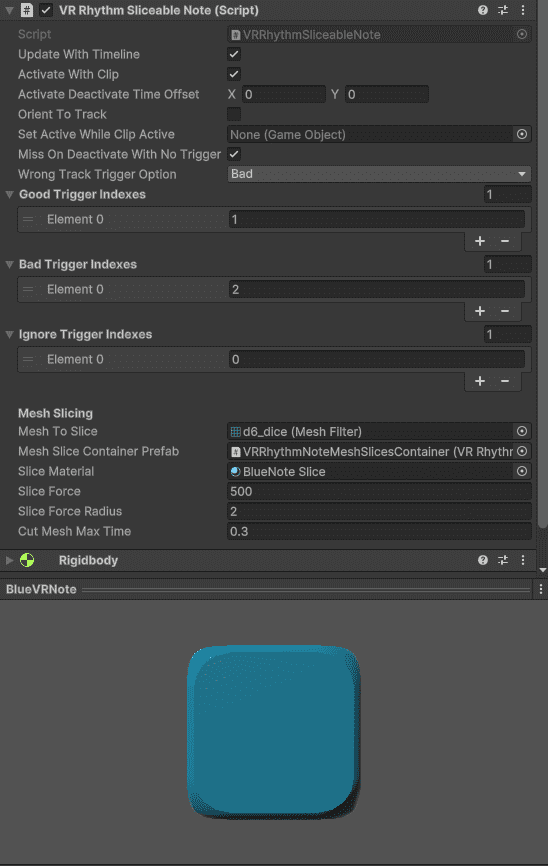
Both of these use an “Index”. This allows the VRNote to know which inputs are bad or should be ignored. For example blue sword shouldn’t be used to cut red blocks in demo scene. And the “Dodge Blocks” should ignore swords but hit the head collider.
VR Rhythm Input Collider Trigger
A simple OnTrigger input that sends an input event to the note if it enters the Trigger collider attached.

This is used in the demo scene for the head. With the idea that the player should dodge some obscales by moving.
VR Rhythm Input Slice Trigger
These are the components set on the swords which detect if you hit a note. We an interpolated set of raycasting to get better accuracy for fast movements. Each Fixed updated we check if any of the raycasts projected from interpolated previous and new positions hit any notes. This is more reliable than OnTrigger events which may miss the note when moving at extreme speeds
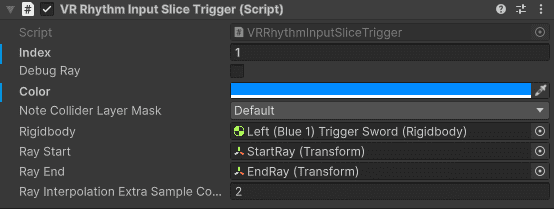
If need be increase the “RayInterpolationExtraSampleCount” but be mindful to not overdo it as it may tank the performance if set too high.
VR Rhythm Note
Similarly to the triggers there are two VR Rhythm Notes
- VRRhythmTriggerNote
- VRRhythmSliceableNote
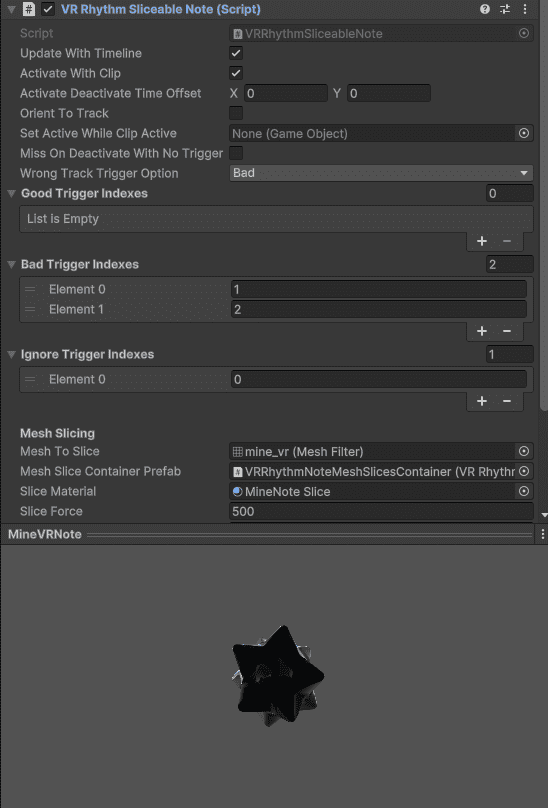
The Dodge Block is a VRRhythmTriggerNote. It only triggers when entering the head as speficied by the Bad indexes
The Blue, Red and Mine Notes are VRRhythmSliceableNote. The differente good, bad indexes lets us easily specify which not should be hit by which trigger.
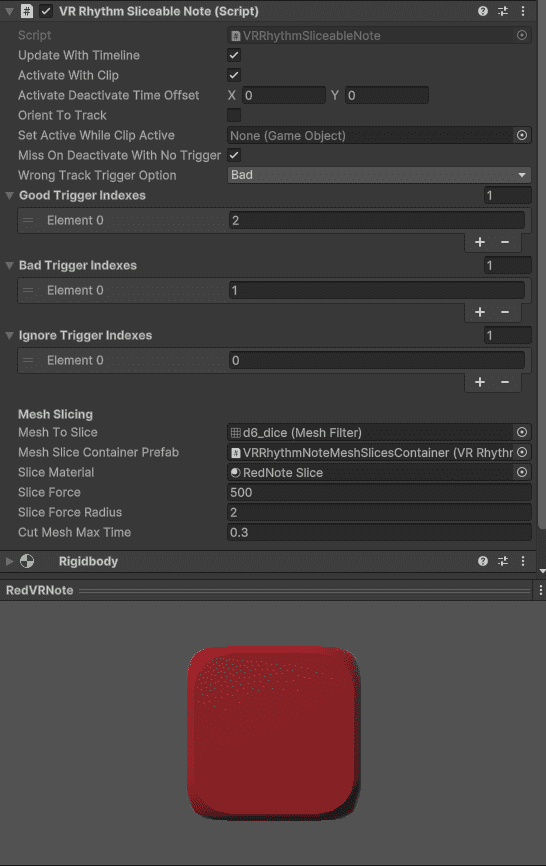
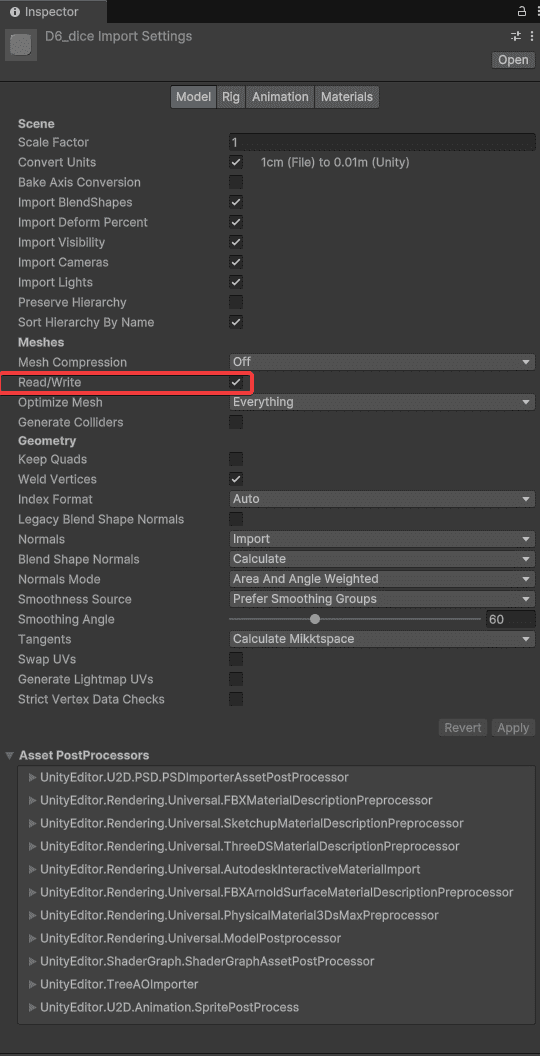
For the slicing effect to work make sure your 3D model is set to Read/Write. Otherwise you won’t be able to cut the mesh and it will throw a warning.
MIDI
Midi files that are added in the project can converted into rhythm timelines.
To parse Midi files we are making use of the Open source C# library “Melanchall.DryWetMidi”, you can learn more about it here
When a file with the extension “.mid” is imported in the project it will be converted into a “MidiFileAsset”. When selecting the midi file in the Unity project you will find a very convinient button to “Create Midi To TimelineAsset”.
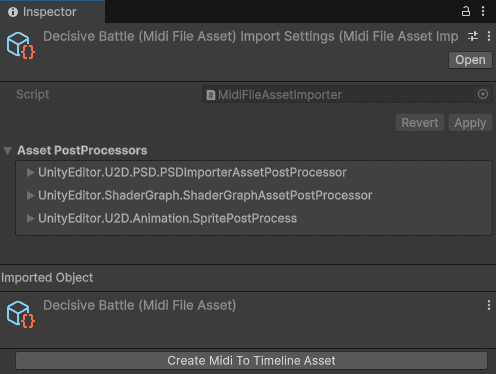
Press that button and you will create a scriptable object that you can use to convert your midi notes into rhythm timeline notes.
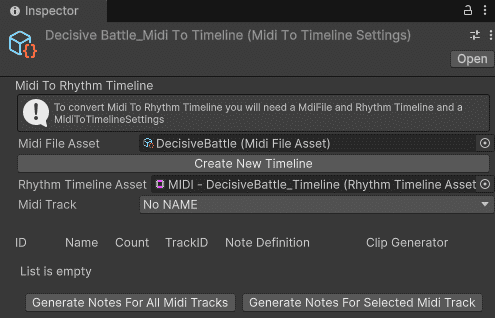
Assign your Midi File Asset and your target RhythmTimelineAsset
If you press the MidiTrack dropdown you’ll find all the tracks on that midi file
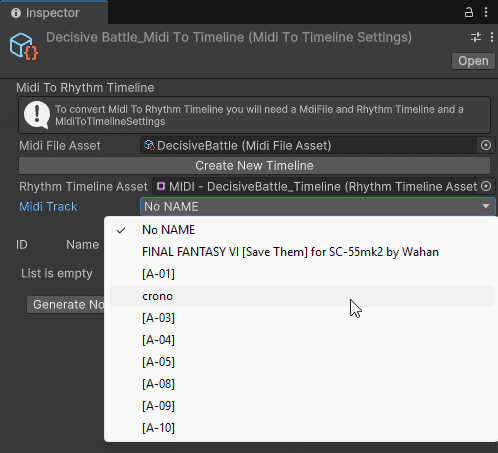
You can select a midi track to find all the midi notes available on it. Each midi note are categorized by a note ID which is linked to a pitch (i.e. E5 or G6, etc…) You’ll conviniently see how many notes of that type exist on the track.
You can then assign the TrackID, note definition and Clip Generator to be used to generate the notes on your timeline. The generated notes will have the exact timings from the midi files.